Wednesday, December 9, 2015

Marble Cake

I am posting a recipe of a cake, with a combination of vanilla and chocolate flavour mixed together which forms a pattern of marble i..e Marble cake..Hope most of them have heard about this cake..It tastes so delicious and my son's favourite too..I made this cake many times, but could not click pictures and couldn't post that time..So I decided to click the pictures when I made this one month before and post it...I include the step of preparing the marble pattern..Hope it will be helpful..This cake is easy to make...Do prepare this cake and let me know the feed back..Let us go to the recipe :)


      Ingredients
  • All purpose flour - 2 cups
  • Baking powder - 1 tsp
  • Baking soda - 1/4 tsp
  • Salt - a pinch
  • Eggs - 3 large no.s
  • Sugar -  3/4 cup ( powdered)
  • Condensed milk - 1 tin ( can use l cup powdered sugar instead)
  • Unsalted butter - 100 gm
  • Vanilla essence - 1 tsp
  • Unsweetened cocoa powder - 2 tbsp
  • Warm milk - 1/4 to 1/2 cup
  • Choco chip - few for decorating ( optional)
    Method
  • Keep all the refrigerated ingredients in a room temperature for 30 mins..Its very important..
  • Preheat the oven to 180 degree C.. Grease the pan with some butter or oil sprinkled with flour and tap the excess flour..Can use butter paper instead..Keep aside
  • In a bowl, add flour, baking powder, baking soda and salt and mix well with a large spoon or whisk thoroughly and keep aside..
  • In another large bowl, add softened butter and sugar and beat well till creamy..Add condensed milk and beat again for few seconds till combined..
  • Add eggs one at a time and beat at a medium to high speed till combined and double in volume..
  • Add vanilla essence and beat for few seconds
  • Add the dry ingredients ( flour mixture) alternately three times and beat at a very low speed. You can also fold it with a large spoon slowly instead of a beater..
  • Add little warm milk 1/4 cup at a time and beat at a very low speed or fold with a spoon..Batter should be medium thick..If batter is too thick, add little more warm milk and beat again..
  • Divide the batter equally into two separate bowls..Keep one batter plain..
  • Another bowl, add cocoa powder and beat at a very low speed..


  • In a greased cake pan, add large dollop of vanilla batter and another dollop of cocoa batter alternating each one..See the pic below ( I forgot to click photo of first layer, never mind, I clicked the pic of second layer :) )
  • Spread lightly with a fork as shown in a picture and make a pattern of your choice..
  • Add again another large dollops of vanilla and cocoa batter alternating each one on top of first layer and spread it lightly with fork as mentioned earlier...
  • Repeat the third step..


  • Tap the sides of the cake pan to release the air bubbles and also cocoa and vanilla layers will be separated.
  • Place the cake tin in a preheated oven and bake for about 40 to 45 mins till the fork or knife insert in the center comes out clean..Otherwise bake 5 mins more..
  • Place the cake tin on a wire rack and let it cool for few minutes..Then flip the cake on a wire rack..Add choco chips on top of the cake,when it is still warm ( optional )..Let the cake cool completely.
  • Cut into slices and enjoy..I like to eat warm from the oven..
  • Store in a airtight container when it cools completely..It will stay good for 3 days at room temperature , other wise refrigerate it will stay good for 1 week..But mine finished 2 days itself 


Sunday, December 6, 2015

Rajma Salad - Kidney bean salad

One must include salads in our daily meals..salads mostly used raw vegetables,mixed all together and used any seasoning like salt, olive oil, vinegar or lemon juice..It is definitely a healthy one ..It contains most of the essentials vitamins required for our lives..There are many ways of preparing salad..One of the salad I am posting here is, Kidney beans ( Rajma) salad..This salad contains kidney beans and other chopped vegetables seasoned with salt, pepper, lemon juice and vinegar..This salad is so tasty, even salad haters will definitely love this..Do prepare this salad and include in your  meals..You can eat by itself too, it will definitely fill your tummy ..Let us go to the recipe


       Ingredients
  • Kidney beans ( Canned / Freshly boiled ) - 1 to 11/2 cups
  • Finely chopped onion - 1 no.
  • Finely chopped tomato - 1 no.
  • Finely chopped cucumber - 1 large no.
  • Finely chopped mint leaves - 2 tbsp
  • Finely chopped parsley leaves - 3 to 4 tbsp ( can use coriander leaves instead)
  • Finely chopped mix bell peppers ( capsicum), yellow, orange, green, red - 1 1/4 cups
  • Vinegar - 1 tsp
  • Lemon juice - 1/2 to 1 tbsp
  • Pepper powder - 1/2 to 1 tsp
  • Chat masala - for sprinkling ( optional)
  • Salt - according to your taste
       Method
  • If using fresh kidney beans: soak them in water overnight. Add soaked kidney beans with little water in a pressure cooker and cook it for 5 to 6 whistles till soft..Be careful, beans should not be mashed...Drain the beans and keep aside..
  • If using canned kidney beans: Open the can and drain out the water from it..Wash the beans and keep aside..
  • Add all the ingredients one by one in a large bowl and toss well..
  • Serve immediately..Remaining salad can be refrigerated
  • Enjoy this tasty salad..
      Notes
  • Make sure to chop the vegetables and herbs very finely..Do not slice it, as it may not taste good
  • If you don't have parsley leaves, add coriander leaves instead..But parsley leaves give nice flavour to this salad..
  • Seasonings and vegetables can be adjusted according to your desire and taste..


Monday, November 30, 2015

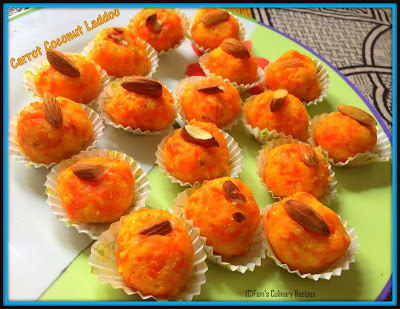
Carrot Coconut Laddoo ( Truffles)

I am posting a recipe of Indian sweet in a form of truffles or laddoo, Carrot Coconut Truffles..Its preparation of similar to Carrot Pumpkin Halwa, as I post earlier..As in a name, this sweet is a combination of both grated carrot and desiccated coconut,which is shaped into balls..Its easy to make and tastes delicious..Lets go to the recipe :)

                                                           Recipe adapted from here


      Ingredients
  • Grated Carrot - 2 cups
  • Desiccated Coconut - 1 1/2 cups (can use freshly grated coconut too)
  • Cardamom powder - 1 tsp
  • Condensed milk  - 1/2 to 3/4 tin
  • Rose water - 1 tbsp
  • Ghee/Unsalted butter - 1 1/2 tbsp
  • Almonds sliced - few for garnishing
      Method
  • In a heavy non stick pan, heat ghee in a low flame and add grated carrot and saute it till cooked i.e  it should change colour and turn soft..It may take about 10 to 12 mins..
  • Add condensed milk 1/2 tin at a time and let the carrot cook for a few minutes..
  • Then add dessicated coconut, rest of condensed milk, cardamom powder and rose water and saute all together till the mixture is well combined..
  • Saute till the liquid evaporates..Be patient at this step..It may take around 5 to 8 mins to evaporate..Can adjust the flame from low to medium..
  • Once the mixture forms thick mass, switch off the flame and transfer the mixture into plate to cool for few minutes..
  • Grease your hands with ghee..Take out small portion of the mixture and shape it into ball..Continue the step and make it into equal sized balls..You can roll the balls in desiccated coconut as you wish,but I ignored this step..
  • Decorate with sliced almonds..Serve hot or cold as your wish..Remaining can be refrigerated..
  • Enjoy :)


Saturday, November 28, 2015

Carrot Pudding

I am sharing a recipe of one of the dessert, Carrot Pudding..As in a name, this pudding is rich in carrot and its tastes delicious..I prepared for my family after Friday lunch few days before..This is my own experiment which turns successful..Everyone in my family loved it very much..Nothing much to say, Let us go straight to the recipe


      Ingredients
  • Milk - 2 1/2 cups + 1/2 cup
  • Carrots - 2 large
  • Fresh Cream - 100 ml
  • Condensed milk - 1 tin
  • Sugar - 3 to 4 tbsp (adjust according to your sweet level)
  • China grass - 10 gm
  • Water - 3/4 cup
          For decorating
  • Ghee - 2  tsp
  • Sugar - 1/4 tsp
  • Carrot shredded - 1/4 cup
  • Cashew nut chopped - few
    Method 
  • Soak China grass in a 3/4 cup of water for 30 mins
  • Pressure cook the carrot till cooked and soft. Take out the cooked carrot and set aside to cool completely.
  • Blend cooked carrot with 1/2 cup milk in a blender/mixi till it form puree.
  • In a sauce pan, mix together 2 1/2 cups of milk, condensed milk, sugar, fresh cream and carrot puree and cook in a low flame for few minutes..Do not heat at high flame as fresh cream will curdle.Make sure to stir at intervals.
  • Another sauce pan, add china grass along with a soaked water and heat at high flame till it dissolves completely..Make sure to stir in between..switch off the flame..
  • Immediately pour melted china grass through sieve into the milk -carrot mixture and mix thoroughly..Taste and add little more sugar if needed..Switch off the flame..
  • Pour the mixture into the wet pudding dish and set aside to cool completely..Lets make decorat ingredients 'For Decoration' as mentioned below..
  • In a fry pan, heat ghee in a low flame..Add chopped cashew nuts and saute till light brown..Drain and keep aside..
  • In same ghee, add grated carrot and saute at a medium flame till carrot changed colour and turned soft.
  • Add sugar and mix well..Cook for few seconds and saute well..Off the flame
  • Decorate the top with ghee sauted cashew nuts and carrot carefully..
  • Wrap the pudding dish with plastic wrap and refrigerate for 6 hrs or overnight till pudding is set..
  • Cut into square shape and enjoy


Friday, November 27, 2015

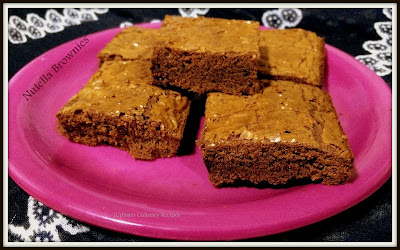
Nutella Brownies

I am sharing the recipe of one of the easiest and yummy baked dish, Nutella Brownies. As in a name, the main ingredient of this brownie is Nutella ( Chocolate Hazelnut Spread).Unlike cake, brownie does not need seperate bowl for wet and dry ingredients.Its done everything in one bowl.I read some of the brownies might use leaving agents like Baking powder and Baking soda.I saw the recipe somewhere from google,but I changed a bit.When I read this recipe, it mention to have l cup of Nutella, but I used half cup of Nutella and half cup of cocoa powder..It does not require any leaving agent..I have a doubt regarding this.To my surprise it baked perfectly and its texture is soft..It tastes so yummy..My son loved it very much..Its finished two days itself..My son told me to bake again..So I baked again for him :)..Let us go straight to the recipe


      Ingredients
  • Melted Butter, cooled slightly - 1/2 Cup
  • Eggs - 2 no.s 
  • All purpose Flour - 1/2 Cup
  • Nutella - 1/2 Cup
  • Cocoa powder - 1/2 Cup
  • Brown Sugar - 1/2 cup 
  • Salt - 1/4 tsp
  • Vanilla essence - 1 tsp
      Method
  • Melt butter in a microwave or in a stove top..Keep aside to cool slightly.
  • Grease a square pan with butter/oil and keep aside..You can use butter paper instead of greasing..I use Silicon square pan,so no need to grease it..
  • Preheat oven to 180 degree C..
  • In a bowl, beat eggs with a whisk or beater till pale..
  • Add vanilla essence and sugar and beat again till sugar dissolves..
  • Add cocoa powder ,Nutella and salt together and beat well..
  • Add flour and melted butter slowly and beat again..
  • The consistency of batter should be pour able..If batter is too thick, add few tbsp of water and beat well..
  • Pour this batter in a baking dish and bake for about 35 to 40 mins,when fork insert in the center comes out clean..Otherwise bake 5 mins more..
  • Keep this in a wire rack to cool for few mins...Then invert the brownies on a wire rack and let it cool completely..
  • Cut into squares and enjoy it with a cup of tea or coffee..


Tuesday, November 10, 2015

Custard Apple Pudding - Seethapazham/ Seethaphal Pudding


Today, I am posting a recipe of one of the tasty and delicious pudding, Custard Apple/ Seethapazham pudding...You might be thinking how do I make pudding with this fruit, even though it is difficult to eat t :P...I think most of them might have known that, custard apple pulp contains lots of seeds, when you cut into halves, the pulp is stuck on seeds itself..We have to suck the seeds in order to get pulp..This fruit itself is very tasty,but its difficult to eat as told earlier:P:D..Believe me,it is not difficult to take pulp while making pudding..I will show you with step by photos,which is mentioned in 'method' section..Let's go to the recipe :)


     Ingredients

  • Milk - 2 1/2 Tea Cups
  • Ripe Custard Apples - 2 no.s
  • Condensed milk - 200 gm ( 1/2 tea cup)
  • Sugar - 3 tbsp ( according to your sweetness)
  • Agar agar ( China grass) - 8 gm
  • Water - 1/2 cup
  • Coarsely powdered Almonds - for garnishing
         Method
  • Soak the china grass in a half cup of water for 30 mins..
  • Cut the custard apples into halves and scoop out the pulp with a spoon..
  • Transfer the pulp into mixi grinder and add very little milk about 1 tbsp...

Custard Apple image by google


  • Grind into paste by quick pulse, two times..Do not grind too much as seed will also grind along with that,which will not taste good..You can see the seeds that separates from pulp..Transfer the pulp into plate and take out the seeds and throw it...


  • In a saucepan, add milk,condensed milk and sugar and mix well thoroughly..Then switch on the flame and heat it in a low flame..No need to wait for bubble to appear..Stir well at interval to avoid burning at bottom..
  • In another sauce pan, add china grass along with soaked water and heat at high flame and stir at intervals..Heat till china grass dissolves completely..Off the flame..
  • Off the flame of milk mixture and add custard apple puree and mix well...
  • Add melted china grass quickly into the sieve and mix thoroughly..
  • Taste and add sugar if needed..
  • Pour the mixture into the wet pudding dish and allow the mixture to cool completely..
  • Cover it with a plastic wrap ..Refrigerate till six hours or overnight till set..
  • De mold the pudding into the plate ( this step is optional) and decorate it with powdered almonds.
      Note
  • Make sure to use a ripe custard apple i.e it should be soft when touch outside,in order to make this pudding..Otherwise pudding will not taste good..
  • You can also make this custard apple pulp into milk shake..


Monday, October 19, 2015

Spring Roll ( Malabar Style )

 Hi Readers..I am back to blogging :)..Being called a lazy blogger myself, I don't update recipes often..I post recipes whenever I am in good mood...There are some photos which are saved in my draft,whose recipes are yet to be published...One of the recipe is mentioned below, which is saved in my draft long time ago but keeps on postponding :D..I made this snack on Ramadan which is saved in my draft incomplete,but forgot to publish..
I am sharing a easy and tasty Malabar Snack,Spring Roll...Spring roll may be of two types: First type is Chinese spring roll,which is made with storebought/homemade thin sheet ( similar to thin chappati or samoosa sheet) which is rolled with masala inside and deep fried and second type is Malabar version,which is made of thin crepes which is rolled with masala in breadcrumbs and  deep fried.. I prefer malabar version of spring roll..Lets move to the recipe:


     Ingredients

          For crepes ( dosa)batter

  • All purpose flour ( maida) -  1 cup
  • Egg - 1
  • Salt - to taste
  • Water - required

       For Chicken masala

  • Cooked chicken - 1 cup ( chicken cooked with pepper,turmeric and salt,de boned and shredded)
  • Oil - 1 tbsp
  • Onion chopped - 1 large
  • Ginger-garlic paste - 1 tsp
  • Chopped green chilly - 1 or 2 no.s
  • Chopped coriander leaves - 1 tbsp
  • Pepper pdr - 1/2 tsp
  • Turmeric pdr - 1/4 tsp
  • Garam masala pdr - 1/2 tsp
  • chopped curry leaves - 1 tbsp

       For dipping and rolling

  • Egg - 1 large
  • All purpose flour - 1 tsp
  • Bread crumbs - required

     Method

        For Chicken masala
  • In a fry pan, heat oil and add chopped onion sprinkled with salt and saute till translucent.
  • Add ginger garlic paste and chopped green chillies and saute well till raw smell disappears.
  • Add all the spice powders and saute till raw smell disappears
  • Add cooked chicken and mix well at a high flame for few seconds..
  • Then add salt and chopped curry leaves and mix well..Off the flame and set aside to cool..
        For making crepes ( dosa) and spring roll
  • Combine all the ingredients mentioned for dosa..Make thin batter by adjusting the quantity of water..Batter should be of pourable consistency..
  • Heat a fry pan, pour small laddleful of dosa batter and spread lightly..Cook one side and keep it on a plate..No need to flip other side..
  • Place one tablespoon chicken filling immediately over the edge of dosa.
  • Fold the edge till the filling is covered completely..
  • Then fold top and bottom part of dosa
  • Roll the dosa tightly and stick the end slightly..
  • For quick reference see the picture below:
      Image Courtesy: Google
  • Then make other dosa and continue the step till all the spring rolls are used up
  • In a small bowl, mix egg and flour together and make it into paste..
  • Dip the rolls in a egg-flour mixture and roll it on a bread crumbs..
  • Deep fry the spring rolls till all sides are golden brown..
  • Drain and keep these in a paper kitchen towel..
  • Serve hot with a cup of tea or coffee..


Saturday, August 29, 2015

Butterscotch Praline Cake - #100th Recipe Post

I am glad to inform you that it is my 100th recipe post..Thank you all my dear readers for your support and encouragement..Expecting same for my future recipe post too..I decided to share something sweet for this occassion..It is Butterscotch Praline Cake..I baked this cake a month ago for my younger sis birthday,who came to stay with me for few days...I saved this recipe mainly to post in this occasion..My mom and sis love this cake very much..Its much better than store bought one..
Coming to the recipe,this is a rich and delicious cake with the flavour of caramel and lots of caramalised nuts ( praline)..I got the recipe from various sources, combine here and there and made by own sauce and frosting..This step may involve lots of steps,but its a worth..It involves making vanilla cake which is sandwiched with caramel sauce,covered with frosting and decorated with crushed praline (caramalised nuts)..Do make the mentioned ingredients earlier and assemble later..So you won't feel its a heavy task :P...I feel when I try to decorate the top of cake with whipped cream, it is little messed up,I feel dissappointed :(..Never mind, it tastes really delicious..Do try this cake and give feedback :)


     Ingredients

        For Vanilla Sponge Cake
  • All purpose flour - 1 1/2 Cup
  • Baking powder  -  1 tsp
  • Baking soda  -  1/4 tsp
  • Eggs  -  3 no.s  (keep at room temperature for 30 mins)
  • Canola or any veg oil - 1/2 cup
  • Superfine white sugar ( powdered sugar) - 1 cup
  • Milk - 3/4 cup  ( keep at room temperature for 30 mins)
  • Vanilla essence - 1 tsp
  • Salt - 1/4 tsp
      For Caramel Sauce
  • Unsalted Butter - 1/2 cup
  • Brown sugar - 1 cup
  • Heavy cream ( whipping cream) - 3/4 cup
  • Corn flour - 2 tsp
      For Praline
  • Butter - 1 tsp
  • White sugar - 1 cup
  • Any mixed  nuts of your choice - 1 cup ( I used cashew nuts, peanuts and almonds)
      For Butterscotch frosting
  • Whipping Cream - 250 ml ( I used low fat whipping cream)
  • Icing sugar  - 2 tbsp
  • Brown sugar - 1/2 cup
      Method

         For Vanilla sponge cake
  • Preheat the oven to 180 degree C..Grease the cake tin with butter and flour and tap the excess flour or you can use parchment paper ( butter paper)..
  • Mix flour, baking powder and baking soda in a bowl thoroughly and keep aside..
  • In another large bowl,add eggs and salt and beat at high speed till creamy..
  • Add vanilla essence and sugar and beat again..
  • Add flour mixture and milk little by little three times and fold alternately..
  • Pour the cake batter in a greased cake tin and tap at the sides to prevent air bubbles..
  • Bake for about 35 to 40 mins depending upon your oven,till the fork or knife insert in the center of the cake comes out clean..
  • When it cools down, keep the cake on a wire rack to cool completely..Meanwhile make caramel sauce,frosting and praline as mentioned below..


Preparation of Vanilla Cake

(Click the picture to view enlarge)


         For Butterscotch Frosting
  • Beat the cold whipping cream and other mentioned ingredients till thick and stiff peaks forms..Refrigerate it..

Preparation of Butterscotch Frosting

(Click the picture to view enlarge)

         For caramel sauce
  • Heat the sauce pan..Add butter and melt in a very low flame..Take care it should not change colour, otherwise it will burn..
  • Add brown sugar and stir till it dissolves completely..
  • Turn the flame to lowest and add heavy cream and stir..Do not boil at high flame as cream will curdle, slightly boil when added cream..Off the flame and let it cool slightly..
  • Add corn flour and mix well without any lumps..When it cools completely, refrigerate it..Sauce will thickens when refrigerated..


Preparation of Caramel Sauce

(Click the picture to view enlarge)

          For praline ( Caramalised Nut )
  • Grease the aluminium foil with a oil and set aside...
  • In a pan, add butter, white sugar and nuts..heat in a medium flame till it changes brown colour..Immediately turn the flame to low and stir well for few seconds..Off the flame..
  • Pour this mixture immediately in a greased aluminium foil and let it cool completely..
  • When it cools completely,it turns to solid form..Take out from the foil carefully and break into small pieces..
  • Add the praline pieces in a grinder and grind into coarse powder..Transfer it into plate and set aside..


Preparation of Praline

(Click the picture to view enlarge)

         For Assembling the cake
  • Take out the caramel sauce and frosting from the refrigerator and set aside..
  • Cut the top crust of the cake..Cut the cake into two halves carefully...
  • Place bottom half of the cake in a cake stand or a plate and spread large dollop of caramel sauce on top..
  • Sandwich it with other slice of cake and spread remaining caramel sauce on top and sides..
  • Spread the whole cake with butterscotch frosting and level the top and edges with a spatula..
  • Sprinkle crushed praline on top and sides as shown in the picture..
  • Pipe the remaining frosting on top of cake according to your design and place a pinch of remaining crushed praline or nuts on top of it..
  • Refrigerate the cake for 4 hours before serving..Serve cold..


 Assembling the cake

(Click the picture to view enlarge)

       Notes
  • If you don't have brown sugar at home or in your place, don't worry..Grind powdered Jaggery ( sharkara/vellam) along with little white sugar in a grinder..
  • In order to save time, bake the cake earlier and assemble the mentioned ingredients later..You can also make the mentioned ingredients like frosting,praline and caramel sauce earlier before baking cake,its up to you...Don't make everything together as it will feel a heavy task...
  • Remaining whipped cream can be kept in a freezer and you can eat it as a ice cream..
  • The cake tastes better next day..


Sunday, August 16, 2015

Kashmiri Chicken Pulao

I am sharing a recipe of easy and tasty Kashmiri pulao, 'Chicken Pulao'...Kashmiri Pulao is generally yellow in colour due to the presence of saffron or turmeric powder and it is rich in dry fruits and milk...There is plain variety of rice too and also addition is also added like chicken,vegetable and mutton..Now I am sharing a this pulao with boneless chicken...Its easy to prepare and taste delicious..Let us go to the recipe :)
Recipe Courtesy : Adapted from my cookbook, 'Malabar Chef


       Ingredients

        For Rice
  • Basmati Rice - 3 1/2 Cups ( Soak the rice for 10 mins and drain)
  • Milk - 1/2 cup 
  • Water - 4 cup
  • Salt - required
  • Saffron - one pinch
  • Bay leaf - 1 no.
  • Cloves - 6 no.s
  • Cinnamon - 1 small piece
  • Cardamom - 5 no.s
  • Star Anise - 1 no.
  • Onion sliced- 1 no.
  • Veg Oil - 1 tsp
  • Coriander leaves chopped - 1 tbsp
       For Roasting
  • Butter/Ghee - 1 tsp
  • Cashew nuts - 2 tsp
  • Almonds - 2 tsp
  • Walnuts - 3 tsp
  • Onion,thinly sliced - 1 large
      For Chicken Masala
  • Boneless Chicken - 500 gm
  • Onion sliced - 2 large no.s
  • Ginger paste - 1 1/2 tsp for marination + 1 1/2 tsp for masala
  • Garlic paste - 1 1/2 tsp for marination + 1 1/2 tsp for masala
  • Green Chilli paste - 1 1/2 tsp for marination + 1 1/2 tsp for masala
  • Salt - to taste
  • Lemon juice - 2 tbsp
  • Yogurt - 2 1/2 tbsp
  • White Pepper powder - 2 tbsp
      Method

        For Chicken masala
  • Wash and drain the chicken and keep aside..Marinate the chicken with 1 1/2 tsp ginger,garlic and green chilli paste and rest of the ingredients as mentioned in 'For Chicken Masala' and marinate for 20 mins.
  • Heat a fry pan, add vegetable oil,when heated add sliced onion sprinkled with salt and saute till translucent and add remaining ginger,garlic and chilli paste and saute till raw smell disappears..
  • Add marinated chicken and salt and mix well..Close the lid and cook in a low flame for 15 to 20 mins till water oozes out..Don't add extra water..Off the flame and set aside..
         For Rice
  • Add one pinch saffron strand in 1/2 cup milk and set aside for few mins..
  • In a medium size non stick wide pan,add ghee/butter, when heated add almonds,cashew nuts,walnuts and raisins and saute in a low flame till light brown..Drain and keep aside..
  • In a same pan, add thinly sliced onion sprinkled with salt and saute till light brown..Drain and keep aside..
  • Add 1 tsp veg oil,when heated, add all the whole spices mentioned from 'bay leaf' till 'star anise' and saute it..Add sliced onion and saute till translucent..
  • Add saffron soaked milk and 4 cup water and wait till it comes to boil..
  • Add desired salt and few drops of lemon juice ( to prevent sticking rice to each other) and mix well..
  • Add drained rice and close the lid and cook the rice at medium flame..
  • When the water is about to evaporate,add chicken masala and turn the rice slowly..
  • Add chopped coriander,garnish few caramelized onion and nuts and cook in a low flame for about 10 mins..
  • Mix the rice and transfer it into serving dish..Decorate remaining caramelized onion and nuts on top of it..
  • Serve warm..Have it with a pickle, pappad or raita of your choice
       Note:
  • If you don't have saffron, don't worry..You can add pinch of turmeric powder in a boiling water before adding rice..


Monday, August 3, 2015

Umm Ali - Egyptian Baked Dessert


I am sharing a recipe of easy and delicious Egyptian baked dessert, Umm Ali...It can be called Egyptian version of baked bread pudding..It is said that this dessert is invented by the lady 'Umm Ali' which means 'Mother of Ali' in Arabic..The story behind the invention of this dessert is quite interesting..Do read the article  here and here...
There are many methods of making Umm Ali..Baked puff sheet is commonly used as a base of this dessert..Some may also use phyllo sheet ( thin sheet used for making Arabic sweet like baklava) or croissant as a base of this pudding..It is combined with lots of whatever dry fruits or nuts available like raisins, pine nuts, pistachios or almonds and sometimes coconut flakes or desiccated coconut is also used in between..Finally milk with sugar and half of thick cream is combined together and poured on top..Then it is baked in the oven till top part turns brown colour..
I researched this recipe in google and I understood that there is no specific method...One can combine the ingredients according to their desire and bake it in oven till top part turns brown crust...I am sharing my version of this dessert..I made this 1 week ago for Friday's lunch..Everyone loved this dessert very much..I made this dessert previous night for serving next day's ( Friday) lunch..I served it cold.. I think this dessert tastes more delicious if served warm..Okay, Let us go to the recipe :)


      Ingredients
  • Puff pastry - 8 to 10 squares ( thawed)
  • Full fat milk - 2 1/2 cup
  • Heavy cream ( Whipping cream) - 1 1/4 cup
  • Sugar - 2 to 3 tbsp ( according to your sweetness)
  • Any chopped nuts of your choice - as required ( I used pistachios,almonds and cashews)
  • Raisins - as required ( optional)
  • Desiccated coconut - as required for sprinkling
  • Butter - needed for greasing
       Method
  • Thaw the puff pastry at room temperature for 1/2 to 1 hr.
  • Grease the baking dishing with butter and place the puff sheets on it and brush butter on top of puff sheet..Bake it according to the packet instruction for about 10 to 15 mins at preheated oven 200 degree C depending upon your oven..Bake till puff pastry turns brown in colour..
  • When it cools down,take out the puff sheets and tear into pieces..
  • Again grease the baking dish with butter and place torn puff sheets on bottom..
  • Sprinkle nuts,raisins (optional) and desiccated coconut lavishly..Mix puff pastry and nuts together and keep aside..
  • In a saucepan, heat milk and sugar in a medium flame till dissolved..Turn the flame to lowest,add heavy cream and heat till slightly boils..While adding heavy cream, do not heat at high flame and boil too much as cream will curdle...We want the milk-cream mixture to get boiled slightly..Taste and add little more sugar as needed..
  • Pour the boiled milk-heavy cream mixture on top of puff pasty and sprinkle little desiccated coconut again on top.
  • Preheat the oven to 200 degree C..Reduce the temperature to 180 degree C and bake for 20 to 25 mins till milk thickens and form brown on top..
  • Set aside to cool slightly..Enjoy warm or cold as you wish..
       Note:
  • Instead of puff pastry, you can use croissant or phyllo pastry..
  • You can serve it with whipping cream on top..But, I like to have it plain..
  • You can use the nuts and dry fruits whatever is available..Make sure to add lavishly..
  • This recipe is suitable for those who have oven..I am not sure this dessert will get right consistency when cooked on stove top..


Tuesday, July 21, 2015

Chicken Dry Roast - Kerala Style


Normally, chicken dry roast is made by frying the marinated chicken and combined with onion masala..Today, I am sharing a healthy version of chicken dry roast..Instead of deep frying,I boiled the marinated chicken in water till water dries out and combined with sauted onion...Its very easy to make and tastes much better than chicken fry ( deep fry)..Its definitely my own successful recipe...When I made this for Ramadan dinner, my hubby loved its taste and he told me to make this again for Eid lunch..So I made this again for Eid lunch accompanied by Mutton Biryani and Vermicelli-Custard-Coconut Pudding..My bro in laws and hubby loved it very much...Do make this dish and let me know its feedback :)


          Ingredients

          For marination
  • Chicken,cut into medium pieces - 1200 gm
  • Kashmiri Chilli paste  - 2 to 3 tbsp ** (can use Kashmir Chilli Powder)
  • Turmeric pdr - 1/2 tsp
  • Coriander pdr - 1 tsp
  • Garam masala pdr - 1 tsp
  • Ginger-garlic paste - 1 tbsp
  • Salt - as per taste
  • Vinegar/Lime juice - 2 tsp
  • Water - 1 cup
        For Sauting
  • Coconut Oil - 1 tbsp + few for drizzling
  • Onion/Shallots - 1 medium size onion,chopped / 8 to 10 medium size shallots,chopped
  • Curry leaves - required
         Method
  • Wash the chicken thoroughly and drain it..Make slit on the chicken here and there so it will infuse flavours of marinated paste quickly..
  • Marinate the chicken from 'Kashmiri Chilli paste' till 'vinegar' for 1/2 hr to 1 hr in a refrigerator..More you marinate more tastier the chicken will be.
  • Boil the marinated chicken in a large vessel with one cup of water from low to medium flame..Make sure to turn the chicken in between..
  • Boil till water dries out and you will notice thick marinated paste settled at bottom..That's fine..Switch off the flame and transfer into the chicken into the plate..
  • In a kadai or wok, add 1 tbsp coconut oil and heat it..Add chopped shallots or chopped onion,sprinkle salt and cook till translucent..
  • Add few curry leaves and saute it...
  • Add boiled chicken along with thick paste ( remaining thick paste left after boiling chicken) and saute well..
  • Drizzle some coconut oil and cook till chicken turn brown on both sides..
  • Add some more curry leaves and off the lid..Close the lid for some time to infuse flavour..
  • Transfer it into serving dish and serve hot with a slice of lemon or you can squeeze lemon juice before serving..
       Note
  • For making Kashmiri Chilli paste: Remove the stem of Whole Kashmiri Chilli and boil it in a hot water for few minutes till soft..Off the flame and set aside to cool completely..Then add the kashmiri chillies from soaked water and blend well without adding water at this stage..Then add soaked water little by little and blend into thick paste (you can see seeds settled at bottom while soaking k.chillies,ignore seeds and grind it only using water)...Transfer kashmiri Chilli paste in a clean bottle with lid..For longer life, add 2 drops of vinegar in a kashmiri chili paste and mix well..It will stay fresh in a refrigerator for 1 mnt..Make sure to use clean, moisture free spoon while taking spoonful of it..It can be used for any fries and curries...
  • I didn't add any red colour, as Kashmiri Chilli powder itself give red colour..
  • Serve with any side dish of your choice..


Monday, July 20, 2015

Vermicelli -Custard- Coconut Milk Pudding

TakabAllahu Minna Wa Minkum ( May Allah accept good deads from you and me) - Eid Mubarak to all my readers..I couldn't post recipes for few days as I am busy..As soon as Eid is announced by sight of moon ( which falls on Friday 17th in UAE and other gulf countries,except Oman),a day ahead of preparation for Eid is done like cleaning home and preparing dessert or malabar special Eid payasam ( porridge) like Kaayi curry ( plaintain - chana dal coconut milk porridge) and Chakkara chor ( Whole wheat -Jaggery Coconut Milk porridge) is prepared and other stuff for next day Eid..I didn't prepare any payasam,as no one will eat in my house..But I prepared dessert next day for Eid lunch,which I am going to share now..After special Eid prayer in morning, Eid Mubarak greeting is exchanged between relatives,friends and others or exchanged through phone when one's relatives stays far away from their place..Before having breakfast or going to perform Eid prayer, traditional Eid payasam is given,if prepared or Dates and water are eaten before going to Eid prayer, as it is the Sunnah of Prophet Muhammed (P.B.U.H).. Then we had a Eid special malabar breakfast.. I made Neypathal ( Fried rice flatbread ( poori) and beef curry,which I'll share the recipe at later post...For lunch, we had Mutton Biryani and dry chicken roast ,which I'll share later post..
As temperature is very hot and humid in UAE,most of the people spent time indoor,visiting relatives or friends and shopping malls..First time of Eid,we had guests and didn't went anywhere..Second day of Eid,we went to shopping mall..Coming to the recipe, I am sharing my own experiment,tasty and successful pudding accompanied by Eid lunch as mentioned above, Vermicelli Custard Coconut Milk Pudding..Actually, I planned to make Tender Coconut Pudding..I don't have time to buy from my nearby Supermarket.so I ordered.. I found that there is no tender coconut pulp inside, so I could not make that..But there is plenty of coconut water,I soaked china grass (Agar agar)in that and remaining we drank it :)..I badly want something sweet like dessert..Then my eyes caught attention of pakistan vermicelli packet ( which I didn't open earlier) and left over custard powder and scraped coconut..I thought my self,why not combined together and make pudding..At first, I am not sure about its taste..When I served this,everyone including my kid loved this dessert..But my hubby is not fond of vermicelli,so he left that :(..Okay,let us go to the recipe;)


      Ingredients
  • Thin Vermicelli ( Semiya) - 1/2 cup,broken into pieces ( I use Pakistan wheat vermicelli)
  • Full Fat Milk/Low fat milk - 1 1/2 cup + 1/2 cup( I use tea cup measurement)
  • Thick Coconut Milk - 1/2 cup **
  • Condensed Milk - 1 tin ( 395 gm)
  • Sugar - 2 tbsp ( according to your sweet level)
  • Salt - a pinch ( to balance sweetness)
  • China grass ( Agar agar strands) - 10 gm
  • Tender Coconut/Coconut water - 1 cup ( to soak china grass) [ I used tea cup measurement)
  • Vanilla Custard Powder - 2 tbsp
  • Ghee - 2 tsp ( to roast vermicelli)
        For decoration ( optional)
  • Ghee - 1 tbsp
  • Coconut shredded - 2 tbsp
  • Vermicelli - 1 tbsp
  • Cashew nuts - 6 to 7 no.s
  • Sugar - 1 tbsp
      Method
  • Soak China grass in tender coconut water for 10 mins..
  • In a pan, heat ghee and roast vermicelli for few seconds..If using roasted vermicelli, ignore this step..
  • In a sauce pan, add 1 1/2 cup milk,condensed milk,roasted vermicelli,sugar and salt and mix well..Then switch on the flame and heat it in a low flame..Make sure to stir in between to avoid lumps of condensed milk and sugar..
  • Another saucepan, melt china grass along with tender coconut water in low or medium flame till china grass melts completely..Make sure to stir at interval...
  • Add custard powder in 1/2 cup cold milk and stir well to form paste..Then add this custard paste in a boiling milk-condensed milk mixture and stir well in a low flame..No need to get stir continuously as we are not making thick custard..Add thick coconut milk and allow to cook for sometime at low flame..Do not cook at high flame as coconut milk will curdle..Off the flame..
  • When china grass melts completely,off the stove and pour the melted china grass immediately through sieve into the vermicelli-custard mixture while hot and stir well..
  • Pour the mixture into the wet pudding dish..You will see that vermicelli will set on bottom...
  • Allow to cool completely..Then cover it with a plastic wrap and keep it in a freezer for 15 mins till half set,in order to decorate..If you don't wish to decorate,then keep it in a fridge for 6 hrs or more till set...
         For decorating ( optional)
  • Heat ghee in a pan,when heated add sugar,coconut shredded,vermicelli and cashew nuts and stir at medium flame till coconut turns brown colour...Be careful don't stir at high flame as it will burn and taste bitter..You will find,sugar also caramilise, that's fine..Off the flame..
  • Transfer it into plate and allow to cool completely..
  • Add the cooled roasted mixture into the grinder and grind coarsely, don't grind it into fine powder..
  • Take out the half set pudding,remove plastic wrap and decorate the grounded roasted mixture according to your design or just sprinkle on top...
  • Cover again with a plastic wrap, refrigerate for about 6 hours or until set..
  • Cut into square shapes and serve cold..
      Notes
  • To make thick coconut milk: Blend 1/4 cup shredded coconut + 1 cup water thoroughly and pour into the strainer and squeeze it..You will get 1/2 cup of thick coconut milk.
  • You can use normal Indian vermicelli,if you don't have thin vermicelli..But thin vermicelli (pakistan) tastes better..
  • If you don't like vermicelli,you can ignore this step..
  • Decorating the top is optional..But it taste delicious..If you don't have time or don't like decorating, leave it plain otherwise...


Friday, July 10, 2015

Kinna Pathal - Steamed Layered Rice Pancakes ( Malabar Spl)


Today, I am sharing a Malabar Special item, Kinna Pathal..In Malayalam 'kinnam' means big vessel which is used for steaming and 'pathal' or 'pathiri' means rice flatbread..But,here pathiri/pathal texture is of pancake,as it is made by steaming..It is made by adding one ladle full of rice batter in a greased plate and kept it for steaming for few minutes till cooked, then ghee is greased on top and another ladle full of rice batter is added on cooked first layer and kept again for steaming till second layer is cooked, then ghee is greased on top, third ladle full of rice is added and closed for steaming till cooked and so on...This process is repeated till all the layer is used up...In short, it can be also called steamed layer rice pancake..This process is time consuming,but its a worth..It taste so delicious and it has a soft texture..It goes well with any non veg curries of your choice like chicken,mutton or beef gravy...In order to save time, do make this dish while making curry at same time i.e another gas burner,you can steam by adding one ladle full of batter,close the lid till first layer is cooked and you can proceed making the gravy required for side dish same time..Then continue pouring second layer and continue the step..Its my umma's trick to save time..Cooking time depends upon the vessel used for steaming..I used two small steel plates, as it will cook fast..
There is masala kinnapathal too which is made in similar way..Difference is chicken/prawns/beef masala is added each cooked layer and process is repeated..I'll share this version later..Now, I am sharing plain one which is required for gravy...I am sharing this recipe for beginners or others who are eager to prepare this dish..For easy understanding, I am including with step by step pictures..Hope it will be helpful.Lets go to the recipe :)..

Recipe Courtesy: Umma


    Ingredients
  • Basmati Rice /Jeerakashala rice - 1 glass
  • Thick Coconut milk - 3 to 4 cups**
  • Egg - 1 no.
  • Cardamom - 2 no.s
  • Salt - required
  • Ghee + vegetable oil mixed together - 4 to 5 tbsp required for greasing..
    Method
  • Soak Basmati / Jeerakashala rice for 4 to 5 hours..Wash and drain it..
  • In a blender or mixi, add washed basmati /jeerakashala rice,egg and cardamom and blend by using coconut milk..
  • Do not add all coconut milk at one go,other wise its difficult to grind..add 1 cup coconut milk and blend it without any rice grains visible..Then add remaining coconut milk little at a time and blend again..Consistency of the batter should be very thin and watery i.e thinner than normal dosa batter..

 Kinnapathal Batter
  • Heat the steamer by adding little water on bottom..place the steamer stand on top, grease 1 tsp ghee + veg oil on steel or aluminium tin or wide plate and place that on steamer stand..I made it in two small steel plates, in order to save time..I have 2 stands in my steamer, so its easy for me..If you have one stand in your steamer,you can use any large aluminium/steel tin or plate.


Ghee + Veg mixture


Use any one: greased small 2 plates or one large aluminium tin
  • Pour one ladle full of rice batter on greased plate,close the lid of the steamer and cook it till done..

First ladle full of kinnapathal batter poured


Cooked 1st kinnapathal layer
  • Spread 1 tsp ghee + veg oil on top of cooked first layer..


                    ghee + veg oil mixture on cooked 1st layer spreaded..
  • Pour second ladle full of batter on top of first cooked layer, close the lid of the steamer and cook till done..

Second batter poured on cooked lst layer and proceed the step.
  • Spread 1 tsp ghee + veg oil again,pour the third ladle full of rice batter on top,close the lid of steamer and cook til done..
  • Continue the step till all the batter is used up..No need to spread ghee on final top layer...Cook for 3 to 4 mins in a medium flame..
  • When all the layers are cooked, off the flame..Take out the plate which contains kinna pathal and drain the remaining ghee carefully..allow to cool completely.

Cooked Kinnapathal
  • Draw the knife along the sides of the plate and de mold it on plate..
  • Cut into triangle shapes and serve it with any combination spicy non veg gravy of your choice..
     Note:
  • To make thick coconut milk: Take large handful of shredded coconut and pour 4 to 5 cups of water and blend thoroughly in a mixi/blender..Using strainer,pour the coconut mixture into it and squeeze the coconut...You will get about 3 to 4 cups..
  • Make sure, the batter of kinna pathal should be very thinner than dosa batter..Do not make it into thick batter.as kinna pathal will not taste good..
  • If the grinded coconut milk mixture is not enough,never mind, grind by adding little water..
  • If there is remaining coconut milk after grinding,store it in refrigerator and you can use it in any gravies while cooking..


Monday, July 6, 2015

Carrot Pola/Carrot Kums - Malabar Carrot Egg Cake

Today, I am sharing a Malabar Special i.e  Carrot Pola or Carrot Kums..As in a name,the main highlight of this pola or cake is carrots which combined with eggs..Its texture resembles of steamed pudding..Its very easy to make,but cooking time takes bit time..Its taste delicious..Its good for kids who are not fond of carrot..Those who are sweet lover,will definitely love this..My hubby who is a spicy lover,is not fond of this one...But my son loves it..It can be served as a tea time snack or Iftar...Do try this one and impress your family..Do check my other pola recipes:
Dates Pola
Apple Pola
Kadala Pola ( Split Bengal Gram Egg Cake)
Kayi Pola - Fried Plantain Egg Cake


     Ingredients
  • Carrot - 2 large no.s
  • Eggs - 3 large no.s or 4 small no.s
  • Milk powder - 5 tbsp
  • Cardamom - 2 no.s
  • Sugar - 4 to 5 tbsp 
  • Salt -  a pinch ( to balance the sweetness)
  • All purpose flour - 1 tsp ( optional)
  • Milk - 1 tbsp
  • Cashews, almonds or raisins - a few for decorating 
  • Ghee - 1 tsp + 1/2 tsp
      Method
  • In a pressure cooker,cook the carrot till done..Remove the carrot and set aside to cool completely..
  • In a blender, add pureed carrot and rest of the ingredients mentioned..Blend at medium to high speed till combined..
  • Warm a non-stick small sauce pan or fry pan, add ghee and allow to melt in a medium flame, add nuts and fry till light brown..Drain and keep aside..
  • In a same pan,rotate the remaining ghee in a circular motion or grease that ghee with a tissue paper on all sides..
  • Add the blended carrot egg puree in a sauce pan,turn the heat in a low flame and close the lid..Its better to place tawa  under sauce pan, to prevent burning at bottom..
  • When its half cooked,for about 5 mins, add ghee roasted nuts on top..
  • Close the lid and cook for 15 to 20 mins till knife insert into the center comes out clean, also it should brown on sides and bottom..Off the flame..Flip the pola by using plate..
  • Heat 1/2 tsp ghee in another fry pan, rotate and cook other side ( top part,which is decorated with nuts) and cook at medium flame for 3 to 4 mins till brown..[ This step is optional,but I like to have other part cook too]..
  • Off the flame..Flip the pola into plate and set aside to cool..
  • Cut it into desired shapes and serve it hot or chilled..I like to have my pola chilled :)
  • Serve it with a cup of tea or coffee for snack or Iftar..
      Note
  • The quantity I mentioned is enough for my family..If you cook more than 2 carrot, do increase the quantity of other ingredients as well..
  • I cooked the pola in a small sauce pan, so it got the shape of a round cake..
  • No other rising agent like baking soda is added, as egg itself will rise when cooking..
  • In place of cardamom powder, vanilla essence can also be added..But its taste will be slightly different and traditionally it is not added.


Sunday, July 5, 2015

Fruits Pudding


Today,I am sharing tasty and simple pudding, Fruits pudding..The setting used in this pudding is China grass/Agar Agar ( Vegetarian gelatine)...Base of the pudding is plain ( milk) which is topped with lots of fruits..I got this recipe from my old school classmate, Henna,..She gave the ingredients almost double,but I reduce to the quantity into half,which is enough for my family..I served this pudding after lunch ( before Ramadan),everyone in my family loved it except my kid..My son is not fond of too many fruits topped in this pudding :(..Almost half of my pudding is finished one day itself...Do try this pudding,its not complicated to make..Also check my other pudding recipes:
Chickoo-Dates PuddingTender Coconut Pudding and Pistachio-Cardamom Pudding.


     Ingredients
  • Full Fat/ Low Fat Milk - 2 Cups 
  • Condensed milk - 200 gm
  • Sugar - 4 to 5 tbsp ( according to your sweetness )
  • China Grass (Agar Agar Strands) - 8 gm
  • Vanilla or any Fruits essence - 1/2 tsp ( optional)
  • Water - 1/2 cup
  • Any fruits of your choice,chopped small - I used apple, pomegranate, mango and strawberry
     Method
  • Soak china grass strands in 1/2 cup of water for 10 mins..
  • In a sauce pan,combine milk,condensed milk and sugar and heat in a low flame..Stir each intervals to avoid forming lumps..
  • In another saucepan, heat china grass along with soaked water at high heat till dissolves ..It takes about 5 to 6 mins to dissolve china grass..Off the flame
  • Off the flame of milk-condensed milk mixture too..Immediately pour the dissolved china grass into the strainer and stir well while hot...Do not allow milk and china grass solution to cool,as china grass may turn back to solid form and it will not dissolve..Add vanilla essence or any fruit essence ( optional ) and mix well.
  • Pour the milk-china grass mixture into wet pudding dish and allow to cool completely..
  • Cover it with plastic wrap or cling film and refrigerate for 30 mins till half set..
  • Then add chopped fruits on top of half set pudding..Do not add too much fruits..Cover again with cling film and refrigerate for 6 hours or overnight till set..
  • Cut into squares and enjoy chilled..
  • Can serve it with whipped cream,if you desire.. I like to have it plain

Saturday, July 4, 2015

Mutton Majboos


Today, I am sharing Arabic recipe, Mutton Majboos..It can be also called Mutton pilaf or Pulao..Its method is same as I shared earlier in Chicken Majboos ... Only difference, mutton is added in place of chicken..Its very tasty dish and simple to make..Lets go to the recipe :)


   Ingredients:

     For Gravy:
  • Mutton,cut into medium pieces (Bone in) - 500 gm
  • Basmati rice - 3 cups
  • Kabsa Masala ( Arabic masala) / Homemade kabsa masala - 2 tbsp ( recipe given below)
  • Onions,sliced - 2 large or 3 medium sized.
  • Large green Chilies,slit halves - 2 no.s 
  • Tomato puree - of  1 1/2 large tomato ( make a puree of it without adding water)
  • Garlic - 6 cloves + 2 cloves chopped 
  • Ginger - a small pc
  • Knor beef seasoning / 1 maggie beef cube - optional
  • Coriander leaves - 1/2 handful chopped
  • Carrot,diced large - 1/2
  • Potato, diced large - 1 small
  • Toasted pin nuts/cashews/Almonds - to decorate.
  • Loomi( dry whole lime) - 1 ( can substitute it with juice of 1 lime).
  • Saffron - a pinch mixed with 2 tbsp of milk
  • Olive oil / butter - 1 1/2 tbsp

     For Homemade Kabsa Masala:
  • Peppercorns / pepper powder - 1 tsp
  • Coriander seeds/ coriander powder - 2 tbsp
  • Cumin seeds - 1 1/2 tsp
  • Dry red chilies - 2 to 3 no.s ( can use chilli flakes or paprika powder instead)
  • Cardamom - 2 no.s
  • Cloves - 3 no.s
  • Bayleaf - 1
  • Nutmug powder ( jaatika) - a pinch ( if having)
  • Cinnamon - 1" stick

     Method:
  • Soak basmati rice in a water for about 30 mins. Drain and keep aside.
  • Soak loomi ( dried lime) in a hot water for 10 mins.
  • Grind all the ingredients mentioned in 'Kabsa masala' along with 6 cloves of garlic and a piece of ginger and make into paste. If using readymade kabsa masala,ignore grinding part and combine it with ginger garlic paste.
  • Marinate mutton with half of kabsa masala and salt and refrigerate for 1/2 to 1 hr.
  • In a pressure cooker, heat olive oil/butter in a pan, add sliced onion with salt and saute till light brown.
  • Add 2 cloves of chopped garlic and green chilies and saute for a sec.
  • Add tomato puree and saute for few mins.
  • Add half of kabsa masala and saute till raw smell goes away.
  • Add marinated mutton and  mix well.
  • Add knor beef seasoning or  powdered beef maggie cube and saute well ( optional ).
  • Add 6 cups of water ( 1 cup of rice = 2 cups of water) and salt and mix well.
  • Make a hole in the loomi ( it is done to penetrate the juice of it) and add it to the water. You can substitute it with squeezed lime juice if you don't have it. 
  • Close the lid of  pressure cooker and pressure cook for 5 to 6 whistles.
  • Boil the vegetables separately or you can cook vegetables after cooking meat in a pressure cooker about 4 whistles, then add vegetables into it and cook for 2 whistle more...
  • Off the flame. Strain the stock and take out the mutton and vegetables. 
  • Grill  or shallow fry the mutton with little oil or butter for few mins in a low flame.Do not make it too dry. ..Mutton is already cooked,no need to fry for too long. It is done mainly to get grilled or crispy effect. Can grill the vegetables too ( if using). Keep mutton and vegetables aside..
  • Add  cooked sliced onions and loomi back to same vessel...Measure the stock,it might be reduced to 5 cups ( as previously we had 6 cups of water)..Add 5 cups of stock + 1 cup of normal water into the vessel and boil it. 
  • When bubble comes, taste and add salt and drops of oil to prevent rice from sticking..Add drained basmati rice into it ,keep it as medium flame for 3 mins and close the lid.
  • Then keep it into high flame ( be careful not to get burnt at bottom)..When water evaporates, immediately reduce the flame to sim and turn the rice from bottom to top and cook for few mins.
  • Open the lid and sprinkle saffron milk and garnish it with chopped coriander leaves. Close and cook for about 1 min at slow flame. 
  • Off the flame and serve rice on a large plate, place grilled chicken and veggies on top.
  • Decorate it with tossed nuts. ( optional).
  • Serve warm with raita,pickles or chutneys of your choice.

    Notes:
  • Readymade Kabsa masala /Arabic masala and Loomi is available in almost all the stores in Middle east and Kerala too. If you prefer,make homemade kabsa powder as mentioned in the ingredient. You can grind it in large quantities and store it in air-tight container.
  • You can make homemade loomi by sun-drying the lime and store it in airtight container. Otherwise substitute with lime juice.
  • Adding vegetables is optional.
  • Always use same cup for measuring rice and water.
  • Its a simple dish to prepare for large gathering and parties.
  • Mostly large piece of meat is added for making majboos..But I prefer to add medium sized lamb..

Friday, June 19, 2015

Bread Vada - Spicy Bread Donut


Today, I am sharing a quick and easy snack, Bread vada..As in a name,this snack is made with bread and combined another ingredient which is shaped into medu vada ( uzhunnu vada) or donut...This snack is suitable for those who wants to have quick snack and it can be made for few minutes..You can make this snack for iftar too..It tastes crunchy and delicious..Off to the recipe..

Recipe source : here


      Ingredients

  • Bread slices ( white,brown or whole meal) - 5 to 6 slices
  • Yogurt - 1/2 cup
  • Semolina ( rava or sooji) - 1/2 cup
  • Rice flour - 1/4 cup
  • Onion,chopped - 1 small 
  • Curry leaves,chopped - 1 tsp
  • Coriander leaves, chopped - 1 tbsp
  • Chopped green chillies - 1/2 to 1 tsp
  • Cumin seeds - 1/2 tsp
  • Ajwain ( carom seeds) - 1/4 tsp ( optional)
  • Salt - to taste 
  • Oil - for deep frying
     Method
  • Cut the bread into small pieces and combine all the ingredients together in a bowl and make into dough..
  • Divide the dough into small equal parts..
  • Take one dough and gently press and make a large hole in the middle like medu vada or donut as shown in the picture..Repeat with other balls..

  • Deep fry the bread vadas till both sides are golden brown..
  • Drain into kitchen paper towel and serve it with chutney or ketchup..

    Notes
  • You can also add spice powders according to your requirement.


Tuesday, June 16, 2015

Vegetable Fingers

Today, I am sharing healthy and easy vegetable snack, Vegetable Fingers..As name suggests, this contains lots of vegetable and spice and taste delicious too..As Ramadan is approaching near,you can try this snack for iftar or tea tea time snack..This snack is shallow fried in very little oil..Its good for kid who don't eat vegetable..Off to the recipe.


    Ingredients
  • Boiled Potatoes - 2 medium
  • Boiled Carrot - 1/2 of one large carrot.
  • Boiled green peas/frozen peas - 2 tbsp
  • Boiled beans (chopped) - 3 to 4 no,s
  • Chopped green chillies - 2 no.s
  • Chopped onion - 1/2 of one small onion
  • Chopped garlic - 1 tsp
  • Fresh/Dry Fenugreek leaves ( Methi leaves/Kasoori methi) - 1/2 tsp
  • Pepper pdr - 1/2 tsp
  • Turmeric pdr - 1/4 tsp
  • Kashmiri/red chilli pdr - 1/2 tsp ( optional)
  • Garam masala pdr - 1/4 tsp
  • Amchoor pdr ( dry mango pdr) - a pinch ( substitute with few drops of lemon juice)
  • Chopped coriander leaves - 1 tbsp
  • Bread slices - 2 no.s ( grounded into fine powder)
  • Salt - to taste
    Method
  • Mash the vegetables and combine all the ingredients together in a bowl and roll into finger shape..
  • Heat very little oil in a frying pan and fry all the vegetable fingers till light brown on all sides..
  • Serve hot with tomato ketchup or any sauces or chutneys of your choice..
    Notes
  • You can add desired vegetables of your choice..
  • You can adjust the spice powders according to your requirement..You can also ignore some ingredients which is not there in your pantry..
  • Make sure when you boil vegetables,strain the water completely..There should not be any water content in vegetables,otherwise it will break when frying...
  • If you can't shape it, add little more bread crumbs and shape again..


Monday, June 15, 2015

Homemade Mango Ice Cream


Mango is the national fruit in many countries like India,Pakistan,Bangladesh,Philippines and many other countries..There are different varieties of mango available in SM and Hypermarkets like Badami mango, Alphonsa Mango,Kesar,Pakistani mangoes etc..Mango is commonly called as 'King of Fruits'..Its a mango season for few months.. mango is my favorite fruit and I used to buy lots of mango in nearby supermarket..Sometimes I do convert mango into shake,lassi (yogurt smoothie)or dessert..Today, I am sharing a tasty and creamy homemade ice cream...Its so delicious with lots of fresh mango flavor and you don't need to buy anymore store bough ice cream...Its so easy to make homemade ice cream,but it takes more time to set..I made this ice cream before..There are many methods of making homemade ice cream in google..But now I am sharing a creamy texture of ice cream which I found somewhere in google...I am so amazed by its taste..My son loves my ice cream very much..I made this ice cream without ice cream making machine.I use electric beater or blender to make this ice cream...Lets go the recipe..Do try my other mango recipes:
mango lassiTender Coconut-Mango Smoothie and Mango Cheesecake.


     Ingredients
       Yields: 1 ltr Ice cream
  • Fresh Ripe Mangoes - 3 medium ( I use alphonsa mango)
  • Milk powder - 3/4 cup ( I used tea cup measurement)
  • Milk - 1 cup ( I used tea cup measurement)
  • Sugar - 1/2 cup ( I used tea cup measurement)
  • Mango Essence/Vanilla essence - 1 tsp (optional)
  • Whipping cream - 250 ml
    Method
  • Peel the skin and discard the seeds of mangoes..Cut into pieces and keep aside.
  • In a blender, add mango pieces, milk powder, milk, sugar, mango/vanilla essence ( optional) and blend into smooth paste..
  • Keep the bowl and electric beater blades in a freezer for 10 minutes..Then take out and beat the cold whipping cream till stiff peaks forms..
  • Add blended mango mixture into the whipped cream and fold it.

  • Pour the mixture into a container and cover tightly with a aluminium foil or plastic wrap..You can use any large container with tight lid and keep it in a freezer..

  • After 1 hour,take out the ice cream container and beat ice cream again with a electric beater or swirl lightly with a fork..Transfer these into container again,cover tightly and freeze it..
  • Again after l hour, beat again and continue the step..Repeat this step three times..It is beaten three times in order to avoid forming of ice crystal..
  • Freeze it for 6 hours or overnight...
  • Take out the ice cream ,scoop and serve into ice cream bowls..
  •  Enjoy eating this tasty creamy homemade ice cream..You can serve it with a pinch of saffron  and chopped mangoes ( optional)
     Notes:
  • Better use fresh ripe mangoes to make this ice cream..Do not use overripe or under ripe mangoes in making ice cream,as it will not taste good.
  • If using ice cream machine, no need to beat three times..But,if you are using electric beater or blender,you must beat the ice cream three times,after each l hr to avoid forming of ice cream crystals.
  • Always pour the ice cream mixture into container with a tight lid or cover the container tightly with aluminium foil or plastic wrap..Do not keep it in a freezer uncovered as ice crystals will form in top.
  • Instead of mango, you can add any seasonal ripe fruits of your choice or you can make it plain without adding any fruits..