Sunday, April 3, 2016

Toffee Vanilla Pudding


I am sharing the post of dessert once again i.e Toffee Vanilla Pudding...I made this dessert long before but could not post it due to my laziness :( ...This pudding consists of three layers..one layer is butter - biscuit crust, second layer vanilla pudding and third layer caramel or Toffee sauce...This pudding tastes very delicious and I am sure it will finish off quickly :D...This is one of the best pudding I ever made..Every one in my family loved it..Let us go to the recipe :)..

Recipe Courtesy here


     Ingredients

         For crust
  • Marie or any other plain biscuits - 10 to 12 pcs
  • Melted Butter - 3 tbsp
        For Vanilla Pudding
  • Milk - 2 1/2 Cups
  • Condensed milk - 200 gm
  • Sugar - 3 tbsp
  • Salt - a pinch ( to balance sweetness)
  • China grass - 8 gm soaked with 1/2 cup water
  • Vanilla essence - 1 tsp
  • Thick cream - 1 tbsp
          For Toffee sauce
  • Dulce De Leche - 1 tin ( see recipe here )
  • Thick cream - 150 gm 
      Method

          For crust 
  • In a bowl crush biscuits coarsely in a grinder..Transfer these into a bowl..
  • Add melted butter in a biscuit powder and mix well with a hand till it resembles bread crumb..If the powder is dry, add few tsp of melted butter and mix again till wet..
  • Transfer the butter - biscuit crumb mixture in a pudding dish..press and level with a spoon equally on all sides...
  • Place this in a freezer for 15 mins till it becomes hard...

          For vanilla pudding
  • Soak china grass in a half cup of water for 10 to 15 mins..
  • In a sauce pan, add milk, sugar, salt and condensed milk and stir together in a low flame till combined..
  • Meanwhile in another sauce pan, melt china grass along with soaked water at medium to high flame till it dissolve completely..
  • Immediately pour melted china grass through sieve into milk mixture and stir..
  • Off the flame and add vanilla essence and mix well..
  • When this mixture cool slightly, add thick cream and stir well..
  • Pour the mixture over the biscuit crust mixture and let it cool for few minutes..
  • Refrigerate the pudding in a freezer for 30 minutes till set..

          For Toffee sauce 
  • Combine dulce de leche and remaining thick cream ( 150 gm) in a bowl and keep aside..
  • Pour the toffee sauce on top of vanilla pudding and level all sides with a spoon..
  • Decorate the pudding as your choice..I decorate it chocolate sauce and almonds..
  • Refrigerate the pudding for 6 hours or overnight till set..
  • Cut into squares and enjoy this yummy dessert :)


Monday, March 28, 2016

Homemade Dulce De Leche

Today's post I am showing you how to make Dulce de Leche Aka Caramel Condensed milk which can be made easily at home made by using pressure cooker..DDL is made by using condensed milk can which is placed in water poured inside pressure cooker ..At first I am scared that if can will burst when there is whistle..But Alhamdullilah, nothing that sort happened and comes really well :)..This step is so easy to make..Only cooling part is hardest time and you have to get patient :)..It has the taste of caramel or toffee...You will definitely love to eat more spoonful of it :) ...You can make variety recipes by using this DDL like cake, icecream, dessert etc or eat directly as you wish..Next post I am showing you pudding by using DDL..Let us go to the recipe.

                                                          Recipe adapted from here


      Ingredients
  • Condensed milk - 1 tin ( 395 gm)
  • Water - required for pouring.
  • Pressure Cooker
      Method
  • Remove the label of condensed milk tin and keep aside.. If you are using printed tin, ignore it..


  • Pour the water half way through and immerse the condensed milk can as shown in pic .Please note that water level should be just above the condensed milk tin..

  • Close the lid of pressure cooker and cook in a high flame when you hear 1 whistle...Reduce the flame to low and cook for 30 to 40 mins depending how thick and texture of the colour you want.I cooked for about 40 mins to get dark brown colour ...
  • Off the flame and wait for the pressure to release completely..When pressure subsides and cools down, take out the tin by using tongs or two large spoon  ..Never use hand to take out as tin is very hot to handle it..
  • Do not open the lid of condensed milk can immediately while taking out from the cooker, as it is hot inside and  it will splash on your face..wait for the tin to cool completely at room temperature for about 1 hour, then open the lid..
  • This can be used for making pudding, ice cream and cake ...You can eat it directly too..If not using immediately, do refrigerate it...
        Note
  • You can make DDL in  a large pot too... Pour lots of water in a pot ,place condensed milk can and boil for 3 hours...Make sure to add boiling water if water is about to evaporate..This method is time consuming...Making DDL in a pressure cooker is a easiest method as it saves time.


Tuesday, February 16, 2016

Strawberry Trifle Pudding

If you read my earlier post of pudding, it used setting agents like china grass..I am sharing a different pudding which does not contain any of setting agent..One of the pudding I am sharing is Trifle pudding..As in a name, it consists of three layer...There are many types of trifle pudding, which may use fruits, nuts, chocolate etc..But I am sharing a strawberry flavored one i.e 'Strawberry Trifle Pudding'..Bottom layer of pudding consists of cake pieces,second layer custard and third layer whipped cream with sliced strawberries on top..Each layer is sandwiched with homemade strawberry sauce..It is my own version of pudding..It is easy to make and tastes delicious...My family loved it very much..Let us go straight to the recipe :)


    Ingredients

      It includes four steps: Preparing cake, custard, strawberry sauce and whipped cream..It may look       lengthy. But you can prepare these in advance and assemble later, so its easy for you..Ingredients       are mentioned in short below and detailed preparation are explained later..They are:
  • Cake -  recipe given below
  • Strawberry sauce - recipe given below
  • Vanilla custard - recipe given below
  • Whipped cream - preparation given below.
  • Strawberries sliced - few for garnishing
  • Grated dark chocolate - few for garnishing ( optional)
   Method

      1)  For cake

          Ingredients
  • All purpose flour - 1 cup
  • Baking powder - 1/2 tsp
  • Powdered sugar - 1/2 cup
  • Eggs - 2 no.s
  • Oil - 1/4 cup
  • Vanilla / strawberry essence - 1 tsp
  • Milk - 2 tbsp ( if required)
          Method
  • Preheat the oven to 180 degree C..
  •  In a bowl, mix all purpose flour, baking powder and set aside.
  •  In a large bowl, add oil and sugar beat till it combines well..
  •  Add eggs and beat well at a high speed till double in size..
  •  Add vanilla/strawberry essence and beat for one second..
  •  Add half flour mixture and beat at a low speed and make sure to scrap the batter at edges and    beat again..
  • Add remaining flour and beat again at low speed..If the batter is very thick, add milk and beat again..
  • Pour the batter in a greased cake tin and bake it for 30 to 35 mins till fork/ knife/ tooth pick insert in the centre comes out clean..
  • Place the cake in a wire rack and allow to cool completely..

     2) For Custard

          Ingredient
  • Vanilla custard powder - 1 tbsp
  •  Milk - 2 cups
  •  Sugar - 2 to 3 tbsp
        Method
  • Mix custard powder in a half cup of cold milk without any lumps and keep aside..
  • In a sauce pan, boil one and half cups of milk and sugar..Stir well in a low flame until sugar     dissolves completely..
  • Add custard milk into it and stir well in a medium flame for 2 to 3 mins till custard becomes thick or if it coats on a back of a spoon..Immediately lower the flame and stir for few seconds..It should not form too thick..Off the stove and set aside to cool completely..It thickens further when it cools down..

      3) For strawberry sauce

               Ingredients
  •  Fresh ripe strawberries halved - 10 to 12 no.s
  •   Sugar - 3 tbsp
  •   Water - 1 cup
            Method
  •  Boil strawberries, sugar and water together in a sauce pan till strawberries become soft and the sauce thickens..
  •  Off the flame and mash the strawberries with a spoon..It doesn't matter if you leave little bits of strawberry pieces.
  •  Transfer into bowl and allow to cool completely..
    4) For whipped Cream

         Ingredients
  • Whipping cream - 200 gm
  • Powdered Sugar - 3 tbsp
  • Corn flour - 1 tsp.
        Method
  • In a large bowl, beat cold whipping cream in a medium speed for few seconds..
  • Add powdered sugar and corn flour and beat at high speed till it form a soft peaks..Do not overbeat..
  • Instead of sugar and cornflour, you can use icing sugar..
  • Refrigerate the whipped cream..
    For Layering the pudding
  • Cut the cake into small cubes and set aside..
  • Take a wide pudding dish of any shape of your choice..Arrange cake pieces evenly without any gap as shown in the picture..This is first layer.


  • Spread half of strawberry sauce on top of the cake pieces..


  • Then spread custard on top of strawberry sauce..This is second layer.


  • If having space you can top it with remaining cake pieces..I don't have space so I ignore this step..
  • Spread remaining strawberry sauce on top of custard and place few slices of strawberry here and there..


  • Finally spread cold whipped cream on top of it and decorate it with sliced strawberries and grated dark chocolate ( optional)..This is third layer.


  • Cover it with plastic wrap and refrigerate for 4 hours or overnight to infuse the flavour..
  • Cut it into squares and serve chilled..


       Note:
  • In order to save time,instead of baking cake, you can use store bought or left over cake and instead of homemade strawberry sauce you can use strawberry jam..But homemade tastes better..


Sunday, January 17, 2016

Pacha vacha Irachi Curry - Malabar Mutton Stew.

I am sharing a delicious stew which is common in my hometown Kannur, Pacha vacha irachi curry or Malabar Mutton Stew..Its preparation is simple to make with less ingredients..This curry is not very spicy, I am sure the kids as well as adults will definitely loved it..Its definitely my mom's recipe..It goes well with any combination of your choice like ghee rice, chappathi, poori, appam etc..My favourite combination is with Madaki parathiya Chappati ( Folded chappathi layered with ghee/oil).Let's go to the recipe :)

Recipe courtesy: Umma


      Ingredients
  • Mutton - 1/2 to 1 kg
  • Potato - l large cut into large pieces ( optional)
  • Onions - 2 no.s sliced
  • Tomato - 1 large sliced
  • Ginger-garlic paste - 2 tsp
  • Green chillies - 2 no.s sliced
  • Turmeric pdr - 1/4 tsp
  • Black pepper pdr - 1/4 tsp ( optional )
  • Coriander pdr - 1/4 tsp
  • Garam masala pdr - a pinch ( for sprinkling)
  • Coriander leaves  - a few for garnishing
  • Lemon juice - 1/2 to 1 tsp ( accordingly)** ( Refer Notes)
      To grind
  • Garlic - 2 cloves
  • Yogurt - 2 to 3 tbsp ** ( Refer Notes)
  • Coconut shredded - 1 heaped handful

      Method
  • Wash the mutton thoroughly and drain..Keep aside..
  • In a pressure cooker, add little oil and saute sliced onions sprinkled with salt till translucent..
  • Add ginger-garlic paste and green chillies and saute till raw smell disappears..
  • Add sliced tomato and saute till mushy.
  • Then add all the spice powders mentioned except garam masala pdr and saute till raw smell disappears.
  • Add cleaned mutton and saute well...Add one cup of water into it..
  • Close the lid of pressure cooker and cook in a medium flame for 4 whistles..Off the flame..
  • Add cubed potatoes ( if using) and cook another 3 whistles...If you are not using potatoes, cook for 6 to 7 whistles..
  • Allow the whistle to release itself..Meanwhile grind the ingredients mentioned below..
  • In a mixi or blender, add grated coconut, garlic and yogurt by adding little water and blend well.
  • When the pressure releases, open the lid and switch on the flame.Add blended coconut mixture and lemon juice into it..Taste and add salt..cook in a low flame till bubble appears..
  • If the curry appears watery, add l tsp of rice powder or corn flour into it and mix well..
  • Switch off the flame..Sprinkle Garam masala powder and garnish with chopped coriander leaves..
  • Serve it with any combination of your choice like chappathi, poori, Appam etc..
       Notes:
  • You can use chicken or beef instead of mutton..
  • Vegetarians can prepare it by using any vegetables of your choice.
  • Please do not use too much spice powder other than the mentioned quantity..The colour of the stew should be whitish with a tint of yellow or light brown colour...
  • Yogurt and lemon juice can be adjusted according to your sour level..This stew should not have too much sourness.If your using sour yogurt, add lemon juice accordingly...My yogurt is not sour, so I use around l tsp of lemon juice..
  • If using potato, make sure to cut into equal large cubes..Do not cut into small pieces, as when you are using pressure cooker, it cook very fast and tends to break and dissolve in curry...


Wednesday, December 9, 2015

Marble Cake

I am posting a recipe of a cake, with a combination of vanilla and chocolate flavour mixed together which forms a pattern of marble i..e Marble cake..Hope most of them have heard about this cake..It tastes so delicious and my son's favourite too..I made this cake many times, but could not click pictures and couldn't post that time..So I decided to click the pictures when I made this one month before and post it...I include the step of preparing the marble pattern..Hope it will be helpful..This cake is easy to make...Do prepare this cake and let me know the feed back..Let us go to the recipe :)


      Ingredients
  • All purpose flour - 2 cups
  • Baking powder - 1 tsp
  • Baking soda - 1/4 tsp
  • Salt - a pinch
  • Eggs - 3 large no.s
  • Sugar -  3/4 cup ( powdered)
  • Condensed milk - 1 tin ( can use l cup powdered sugar instead)
  • Unsalted butter - 100 gm
  • Vanilla essence - 1 tsp
  • Unsweetened cocoa powder - 2 tbsp
  • Warm milk - 1/4 to 1/2 cup
  • Choco chip - few for decorating ( optional)
    Method
  • Keep all the refrigerated ingredients in a room temperature for 30 mins..Its very important..
  • Preheat the oven to 180 degree C.. Grease the pan with some butter or oil sprinkled with flour and tap the excess flour..Can use butter paper instead..Keep aside
  • In a bowl, add flour, baking powder, baking soda and salt and mix well with a large spoon or whisk thoroughly and keep aside..
  • In another large bowl, add softened butter and sugar and beat well till creamy..Add condensed milk and beat again for few seconds till combined..
  • Add eggs one at a time and beat at a medium to high speed till combined and double in volume..
  • Add vanilla essence and beat for few seconds
  • Add the dry ingredients ( flour mixture) alternately three times and beat at a very low speed. You can also fold it with a large spoon slowly instead of a beater..
  • Add little warm milk 1/4 cup at a time and beat at a very low speed or fold with a spoon..Batter should be medium thick..If batter is too thick, add little more warm milk and beat again..
  • Divide the batter equally into two separate bowls..Keep one batter plain..
  • Another bowl, add cocoa powder and beat at a very low speed..


  • In a greased cake pan, add large dollop of vanilla batter and another dollop of cocoa batter alternating each one..See the pic below ( I forgot to click photo of first layer, never mind, I clicked the pic of second layer :) )
  • Spread lightly with a fork as shown in a picture and make a pattern of your choice..
  • Add again another large dollops of vanilla and cocoa batter alternating each one on top of first layer and spread it lightly with fork as mentioned earlier...
  • Repeat the third step..


  • Tap the sides of the cake pan to release the air bubbles and also cocoa and vanilla layers will be separated.
  • Place the cake tin in a preheated oven and bake for about 40 to 45 mins till the fork or knife insert in the center comes out clean..Otherwise bake 5 mins more..
  • Place the cake tin on a wire rack and let it cool for few minutes..Then flip the cake on a wire rack..Add choco chips on top of the cake,when it is still warm ( optional )..Let the cake cool completely.
  • Cut into slices and enjoy..I like to eat warm from the oven..
  • Store in a airtight container when it cools completely..It will stay good for 3 days at room temperature , other wise refrigerate it will stay good for 1 week..But mine finished 2 days itself 


Sunday, December 6, 2015

Rajma Salad - Kidney bean salad

One must include salads in our daily meals..salads mostly used raw vegetables,mixed all together and used any seasoning like salt, olive oil, vinegar or lemon juice..It is definitely a healthy one ..It contains most of the essentials vitamins required for our lives..There are many ways of preparing salad..One of the salad I am posting here is, Kidney beans ( Rajma) salad..This salad contains kidney beans and other chopped vegetables seasoned with salt, pepper, lemon juice and vinegar..This salad is so tasty, even salad haters will definitely love this..Do prepare this salad and include in your  meals..You can eat by itself too, it will definitely fill your tummy ..Let us go to the recipe


       Ingredients
  • Kidney beans ( Canned / Freshly boiled ) - 1 to 11/2 cups
  • Finely chopped onion - 1 no.
  • Finely chopped tomato - 1 no.
  • Finely chopped cucumber - 1 large no.
  • Finely chopped mint leaves - 2 tbsp
  • Finely chopped parsley leaves - 3 to 4 tbsp ( can use coriander leaves instead)
  • Finely chopped mix bell peppers ( capsicum), yellow, orange, green, red - 1 1/4 cups
  • Vinegar - 1 tsp
  • Lemon juice - 1/2 to 1 tbsp
  • Pepper powder - 1/2 to 1 tsp
  • Chat masala - for sprinkling ( optional)
  • Salt - according to your taste
       Method
  • If using fresh kidney beans: soak them in water overnight. Add soaked kidney beans with little water in a pressure cooker and cook it for 5 to 6 whistles till soft..Be careful, beans should not be mashed...Drain the beans and keep aside..
  • If using canned kidney beans: Open the can and drain out the water from it..Wash the beans and keep aside..
  • Add all the ingredients one by one in a large bowl and toss well..
  • Serve immediately..Remaining salad can be refrigerated
  • Enjoy this tasty salad..
      Notes
  • Make sure to chop the vegetables and herbs very finely..Do not slice it, as it may not taste good
  • If you don't have parsley leaves, add coriander leaves instead..But parsley leaves give nice flavour to this salad..
  • Seasonings and vegetables can be adjusted according to your desire and taste..


Monday, November 30, 2015

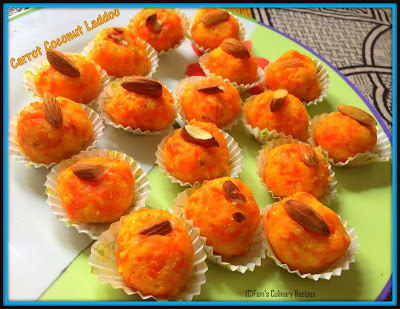
Carrot Coconut Laddoo ( Truffles)

I am posting a recipe of Indian sweet in a form of truffles or laddoo, Carrot Coconut Truffles..Its preparation of similar to Carrot Pumpkin Halwa, as I post earlier..As in a name, this sweet is a combination of both grated carrot and desiccated coconut,which is shaped into balls..Its easy to make and tastes delicious..Lets go to the recipe :)

                                                           Recipe adapted from here


      Ingredients
  • Grated Carrot - 2 cups
  • Desiccated Coconut - 1 1/2 cups (can use freshly grated coconut too)
  • Cardamom powder - 1 tsp
  • Condensed milk  - 1/2 to 3/4 tin
  • Rose water - 1 tbsp
  • Ghee/Unsalted butter - 1 1/2 tbsp
  • Almonds sliced - few for garnishing
      Method
  • In a heavy non stick pan, heat ghee in a low flame and add grated carrot and saute it till cooked i.e  it should change colour and turn soft..It may take about 10 to 12 mins..
  • Add condensed milk 1/2 tin at a time and let the carrot cook for a few minutes..
  • Then add dessicated coconut, rest of condensed milk, cardamom powder and rose water and saute all together till the mixture is well combined..
  • Saute till the liquid evaporates..Be patient at this step..It may take around 5 to 8 mins to evaporate..Can adjust the flame from low to medium..
  • Once the mixture forms thick mass, switch off the flame and transfer the mixture into plate to cool for few minutes..
  • Grease your hands with ghee..Take out small portion of the mixture and shape it into ball..Continue the step and make it into equal sized balls..You can roll the balls in desiccated coconut as you wish,but I ignored this step..
  • Decorate with sliced almonds..Serve hot or cold as your wish..Remaining can be refrigerated..
  • Enjoy :)