Thursday, July 31, 2014

Eethapazham Kums/ Pola - Dates Sponge Cake (Malabar cuisine)


Hi readers..First of all, wishing all my readers Eid Mubarak..Couldn't post recipe for 3 days, as we are busy celebrating Eid like visiting my parents house in Abudhabi and going to malls etc..We couldn't go outdoors like beach or park as summer is worse in UAE..
In Malabar,traditionally Pola/Kums is slow cooked in a small wide pan or sauce pan not oven..Olden days, a wooden beater called 'manth' is used for beating eggs for cakes..It is definitely a hard work and is a best exercise for hand too :D ...Those days, cakes are baked in a small aluminium pan with lid closed and placed coal on bottom and top...At that time,oven and pressure cooker is not available..Got the information from my mom :)..Now-a-days, electric hand mixer and oven is available which makes our life easier :)..So, pola can be baked either in non-stick wide pan or pressure cooker...
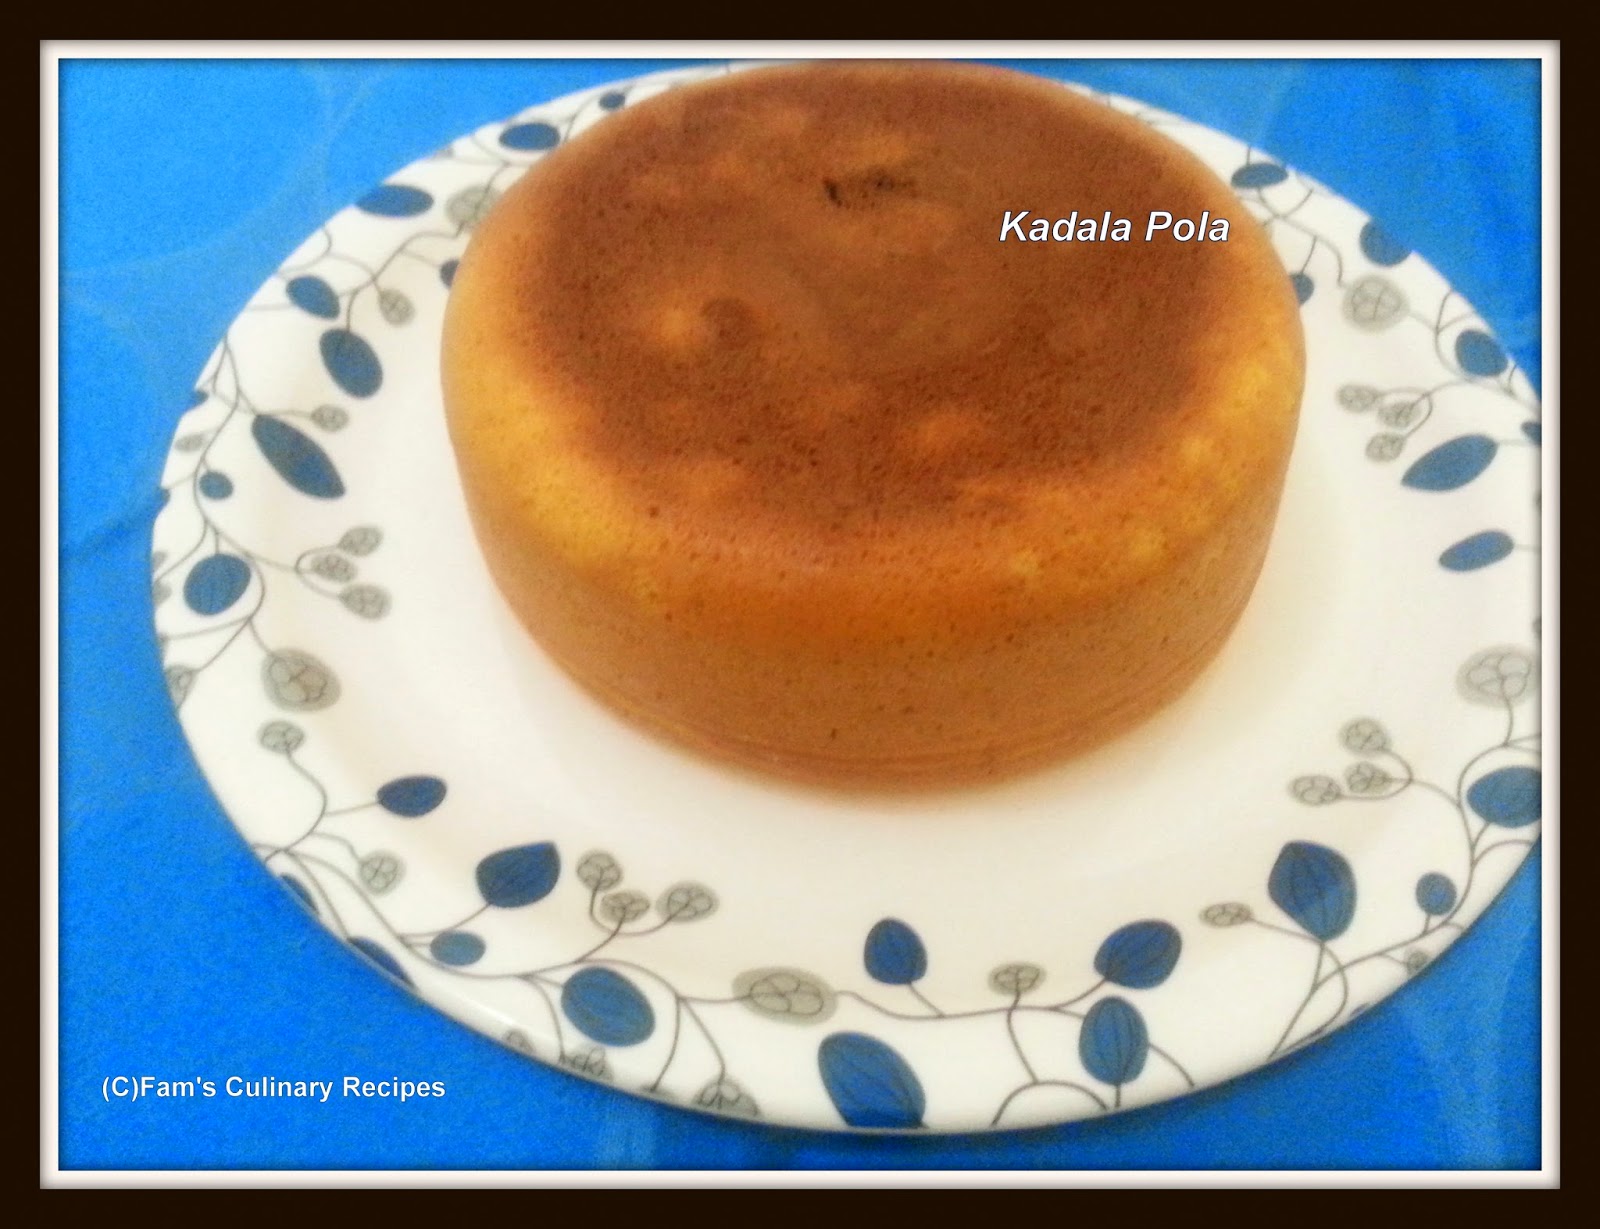
Coming to the recipe, I am posting a recipe of Dates Kums/Dates Pola..Earlier, I shared the recipe of making pola in steamed pudding consistency mentioned here and here..Now, I am sharing a pola in a sponge cake version,which used dates as main ingredient...I got the recipe from my cook book 'Ramadan recipes' by Rasiya Latheef,which I bought from Kerala..We used to make normal sponge cake..but this sponge cake is new to me,I never heard it before...When I read this recipe,I made it right away..I have lots of dates in my pantry and all the recipe mentioned in this book is available in my pantry...I am making this sponge cake in a small non-stick sauce pan, which is slow cooked on a stove top..You can use pressure cooker too, but make sure not to add weight...You can bake it in a oven too, if you desire..Its a tasty cake and definitely healthy too..But be careful for diabetic patient,since this cake contains lots of dates so it is not good for them..Do make this cake and impress your kids and family :)

Recipe Courtesy: Taken from my cookbook,'Ramadan recipes' by Mrs Rasiya Latheef


     Ingredients

  • All purpose flour (maida) - 1 cup
  • Butter ( room temperature ) - 3/4 cup ( I used half cup)
  • Baking soda - 1 tsp
  • Salt - a pinch
  • Powdered sugar - 1 cup   ( I used half cup, its not sweet for me.So,don't reduce the sugar)
  • Small eggs ( room temperature) - 3 no.s
  • Dates,seed removed - 3/4 cup
  • Dates,chopped - 1/2 cup
  • Cashew nut/Almond chopped - 1/2 cup
  • Cardamom powder - 1/2 tsp ( you can use vanilla essence too,but traditionally it is not added)
  • Milk - 1/3 cup for soaking dates + 2 tbsp required for batter ( if needed)
  • Ghee - 1 tsp ( for greasing pan)


    Method

  • Soak dates( not chopped ones)in a 1/3 cup of milk for 30 mins...This is done to grind the dates faster and it gives smooth paste, otherwise it is difficult to grind...


  • In a bowl, add flour, baking soda and salt and mix thoroughly...


  • In a blender, add eggs at high speed till pale...You can beat the eggs with a electric hand mixer too at high speed, in a separate bowl..
  • Add dates along with soaked milk into the egg mixture..

  • In a separate large bowl, cream the butter and sugar together till creamy by using whisk, wooden spoon or electric hand mixer...


  • Add egg-dates mixture into butter-sugar mixture and beat again till sugar dissolves completely..
  • Add flour mixture alternately 3 times and fold slowly in a clock wise direction at regular intervals with a spatula or wooden spoon till no lumps formed..After adding flour, do not overbeat the batter as cake turns hard after baking and always fold slowly...You can also use electric beater too,but turn the 'mode' to lowest...Scrap the batter the sides too and fold again..


  • Add cardamom powder and beat again..


  • Finally add chopped dates and nuts and fold slowly in a clock wise direction..Do not use electric beater at this time..Use spatula or any large spoon to fold these ones..
  • If the batter becomes too thick, add 2 tablespoon of milk and fold again..
  • Heat a non-stick sauce pan or pressure cooker, add l tsp of ghee and grease all the sides..Its better to place tawa under the saucepan to prevent getting burnt from bottom..If using pressure cooker, do not add weight ( whistle) on top..
  • Pour the batter into the pan,close the lid and cook at a very low flame for about 30 to 40 mins till knife insert into the centre comes out clean..If not increase the flame to medium ( be careful not to get burn at bottom) and cook for 5 more minutes till done...


  • Off the flame and flip the cake into the plate..
  • When slighly cools, cut into desired shapes of your choice..
  • Serve warm with a cup of tea or coffee..

      Notes:
  • You can bake it in a oven too..Preheat the oven to 180 degree C and bake for about 30 to 35 mins till done..
  • Leftover cake can be refrigerated and can be kept for 1 week. ( But mine is finished in 3 days itself :D)


\


Sunday, July 27, 2014

Vegetable Bonda - Mashed Potato and Vegetable fritters


Bonda is a commonly made savoury snack in most of the Indian households...It is also made in Indian restaurant and street food stall too..Bonda is made with mashed potatoes which is combined with masala,dipped in gram/all purpose flour batter and deep fried...You might be thinking,why I am sharing such a easy dish? ( I mean Indians )...Well.there is speciality of this bonda..I included extra ingredients,i.e vegetables,which is not normally used in Bondas..Also, I used different spice powders from making of usual bondas ...This recipe is certainly my own..Its tastes amazingly delicious..My hubby loves it very much..I made this bonda two days before...Sorry once again for the late post...Do make this bonda and serve it for your family..Lets go to the recipe :)


     Ingredients
  • Potatoes - 4 small no. or 1 large no.
  • Onion,chopped -1 medium size
  • Garlic-ginger crushed - 1 tsp
  • Chopped green chillies - 1 or 2 no.s
  • Chopped coriander leaves - 2 tsp
  • Chopped curry leaves - 1 tbsp
  • Frozen/fresh boiled green peas - 3 tbsp
  • Chopped carrot - 2 tbsp
  • Finely chopped beans - 2 tbsp
  • Turmeric pdr - 1/2 tsp
  • Chilli pdr - 1/4 tsp
  • Pepper pdr - 1/2 tsp
  • Garam masala pdr - 1/4 tsp
  • Chat masala - a pinch ( optional)
  • Mustard seeds - 1/2 tsp

        For batter
  • Gram flour / All purpose flour - 1 cup
  • Rice flour - 1 tbsp ( for crispiness)
  • Asafoetida ( Hing/ Kayam podi) - a pinch
  • Cumin seeds - 1/2 tsp
  • Red chilli pdr - 1/4 tsp
  • Salt - to taste
  • Water - required for batter

     Method
  • Cut the potatoes into half  and boil in pressure cooker along with skin for about 3 to 4 whistles..
  • When the pressure subsides, take out the potatoes and strain in colander, to remove the water content..
  • When it slightly cools, take out the skin of potatoes and mash the potatoes using potato masher or any large spoon..
  • In a fry pan, heat oil and add mustard seeds and let it crackle..
  • Add chopped onions, crushed ginger-garlic and chopped green chillies and saute for few seconds..
  • Add chopped coriander leaves and add all the spice powders mentioned and saute till raw smell goes away.
  • Finally add all the vegetables and salt and cook at high heat for 2 mins taking care not to let burn..
  • Finally add mashed potatoes and mix well..
  • Add chopped curry leaves and can adjust salt and spice if needed..
  • Sprinkle chat masala ( optional ) and mix well. ( optional)..Off the flame and set aside to cool..
  • When it cools down, divide the mashed potato mixture into equal small balls..
  • Meanwhile make the batter for dipping.. In a large bowl, mix all the ingredients mentioned in 'for batter'..Make into semi- thick batter by adding water little by little... 
  • Take one balls and dip in the batter one by one and deep fry in oil till both sides are slightly brown in colour.
  • Drain and transfer these into kitchen paper towel..
  • Serve warm with ketchup or chutney or serve as it is...Had it with a cup of tea or coffee..


Friday, July 25, 2014

Chemmeen Undaputt - Prawns masala stuffed Steamed Coconut Coated Rice Balls


Chemmeen Undaputt is a savoury Malabar delicacy,which can be served as a breakfast or as a snack..Its is made with rice dough, stuffed with prawns masala, that is rolled into round shape and then coated with shredded coconut and steamed...This snack is common in Kannur ( a district in Northern Kerala) area...As it is a steamed one,so it is definitely a healthy recipe ..Instead of prawns, you can add fish,clams and mussels...Its rice dough is similar as I mentioned in here and here..I made this for iftar 2 days before and my hubby and BIL loves it very much..Its a tasty snack..Prepare it and impress your family..Lets go to the recipe :)


    Ingredients:

    1)  For rice dough:

       I am giving preparation of rice dough in 2 methods..Try any one :)

        Method 1
( This is Kannur way of preparing rice dough for pathiri, ada etc)
  •  Par boiled rice (puzhagalari)- 1 medium Glass
  •  Rice powder - 4 to 5 tbsp or enough for binding the dough
  •  Salt - to taste
  •  Boiled water - to soak the rice
     Or

      Method 2
  • Rice powder - 1 1/2 cup
  • Salt - to taste
  • Boiling hot water - required for kneading dough
    2)  To Grind:

    a) Grated Coconut - 4 tbsp

    b) Fenugreek seed - 1 tsp

     3) For Marination:
  • Prawns/button shrimps(cleaned and deveined) - 300 gm
  • Red chilli/ kashmiri chilli pdr- 1 tsp
  • Garam masala pdr - 1/4 tsp
  • Turmeric pdr - a pinch
  • Salt - to taste 
   4) For Prawns masala:
  • Onions chopped - 2 medium size 
  • Ginger-Garlic paste - 2 tsp
  • Green chilly chopped -  2 no.s
  • Turmeric pdr - 1/4 tsp
  • Red chilli/ kashmiri chilli pdr - 1/2 tsp
  • Garam masala pdr - 1/4 tsp
  • Coriander leaves chopped - 1 tbsp
  • Curry leaves chopped - few
  • Coconut grated - 2 to 3 tbsp 
  • Salt - to taste 
     5)  Other ingredient:
  • Coconut shredded - generous amount for coating 

        Method

      1)  Preparation of prawn masala
  • Marinate the prawns as mentioned and keep aside for 10 mins. 
  • Heat a pan and pour some oil and shallow fry the prawns in batches at medium flame for about 4 to 5 mins turning each side till light brown.
  • Drain and keep on kitchen towel.When cools down,cut the prawns in pieces.
  • If using button shrimps,omit the cutting part. I used prawns, as button shrimps is not available in UAE and some other countries.Button shrimp tastes better. 
  •  In the same pan ( used for frying shrimps), add chopped onions and salt and saute till translucent.
  • Add ginger- garlic paste,chopped green chillies, turmeric pdr, chilli pdr and garam masala pdr and saute till raw smell disappears.
  • Add Chopped coriander and saute again.
  • Then add prawns and saute well.Finally add grated coconut and chopped curry leaves and saute again.
  • Taste it,adjust the salt and spice according to your like.Cover and let it cook for 3 or 4 min at low flame. Off the flame and keep aside.


    2)Making of rice dough

       Method 1
  •  Soak the par-boiled rice in a boiled water for 2 to 3 hrs. Boiled water is must,other wise it is difficult to grind.
  • Grind the par-boiled rice with 1&1/2 cup water in a mixer. 
  • Pour this blended rice mixture to the bowl, add salt. 
  • Then add the "grinded ingredients' ..Grind it coarsely...
  • Add rice powder and make it into smooth dough and divide it into small balls little bigger than gooseberry.
     Method 2
  • In a boiling hot water, add salt and rice powder..
  • At the back of wooden or any large spoon, mix the dough thoroughly..
  • Add the 'grinded mixture' mentioned above and mix well..You can't knead the dough with your hands at that time,as the mixture is too hot to handle :)
  • When it is slighly cools,but should be warm...Knead the dough with your hands and make into smooth dough..
  • Divide it into small balls little bigger than gooseberry.Keep aside 


rice dough

      3) Making of  rice balls
  • Take the plastic cover and apply oil on it.
  •  Place a small rice balls into the sheet and flatten it thinly with your palm.
  • Add 1 heaped tbsp prawns masala in centre and roll into ball shape along with plastic wrap..


  • Then take out the balls and gently smoothen it with your palms...
  • Then roll these balls in a grated coconut..

  • Place the coconut coated rice balls  in the steamer and steam it for about 10 mins or till done.

  • Serve warm with a cup of tea or coffee


Wednesday, July 23, 2014

Mixed Biryani


Earlier, I shared a recipe of the rice combined with prawns,chicken and vegetables in fried rice version here..Today, I am sharing a different biryani with the combination of non veg and veg,i.e Mixed Biryani....Have you heard about it?..Sounds incredible right?...Its biryani masala is made with prawns,chicken and vegetables...I got the recipe from  'Asianet Cookery Show'..Its name amazed me..I never heard about it before... Its easy to make and tastes delicious...I add my own vegetables which is available in my pantry..I shallow fried both prawns and chicken,then combined with vegetable masala..Original recipe didn't mention to shallow fry ...I did it as I want prawns and chicken to get flavour ...Do try this biryani,as a change from normal ones...Let us go straight to the recipe :)

Recipe Source: Asianet Cookery Show


     Ingredients

       To marinate:
  • Chicken Breast,cubed - 200 gm
  • Prawns,cleaned and de-veined - 150 gm
  • Pepper pdr - 1 tsp
  • Garam masala pdr - 1/4 tsp
  • Turmeric pdr - a pinch
  • Salt - adjust accordingly

     For masala:
  • Any vegetables of your choice,diced - 1 cup
  • Large Onion,thinly sliced - 3 no.s
  • Tomatoes,sliced - 2 no.s
  • Ginger-garlic paste - 1 tbsp
  • Crushed green chillies - 6 no.s ( according to your spice level)
  • Chopped mint leaves - 1/4 cup ( reserve half for decorating)
  • Chopped coriander leaves - 1/2 cup ( reserve half for decorating)
  • Turmeric pdr - 1/4 tsp
  • Pepper pdr - 1/2 tsp
  • Garam masala pdr - 1 tsp
  • Lemon juice - 1 tbsp
  • Salt - to taste

     For Ghee rice:
  • Basmathi rice / Jeerakashala rice - 3 cups
  • Water - 4 3/4 cups
  • Salt - to taste
  • Cardamom - 3 no.s
  • Cloves - 4 no.s
  • Cinnamon stick - a small pc
  • Bay leaf - 1 no.
  • Ghee + Oil - 1 tbsp + 1 tbsp

      For decorating: ( optional)
  • Fried sliced onion - 1 no.
  • Fried Cashew,raisins - few( I didn't use)
  • Rose water - for sprinkling

    Method

      For Shallow frying:
  • Marinate the chicken and prawns mentioned in 'To marinate' and set aside for 10 minutes..
  • Heat little oil in a fry pan,shallow fry prawns 2 to 3 minutes till both sides are slightly brown in colour..(Don't overcook the prawns,else it will turn rubbery)..Transfer these to a plate..
  • Then shallow fry chicken for 5 to 6 minutes till both sides are brown in colour..
  • Transfer these to a plate and keep aside..


Shallow fried prawns and chicken

         For Masala:
  • In a pressure cooker, heat oil and add sliced onion sprinkled with salt and saute till transparent..
  • Add ginger-garlic paste and green chillies and saute till raw smell goes away..
  • Add chopped herbs and saute well..
  • Add tomatoes and saute till mushy..
  • Add all the spice powders and saute till raw smell goes away..
  • Add little water and close the lid..Pressure cook for 3 whistles..This is done to make the masala into paste consistency...
  • When pressure subsides, add diced vegetables and mix well...
  • Pressure cook again for 2 whistles...Vegetables are added last after pressure cooking onion masala to avoid it from getting mashed...
  • When pressure subsides,add shallow fried prawns and chicken and mix well..
  • Taste and add salt and spice..
  • Add lemon juice,mix well and cook at low flame for 2 minutes..
  • Close the flame and set aside...

     For ghee rice
  • Soak basmati rice in water for 30 mins.  If using jeerakashala rice,ignore this step.Wash the rice thoroughly with 2 to 3 couplets of water,drain rice in the colander and keep aside.
  • In a large wide non-stick casserole/biryani pot , heat ghee + oil for few seconds.
  • In a same vessel,add all the whole spices mentioned and saute for few seconds.
  • Add water and let it boil till the bubbles comes.
  • Add salt and sprinkle few lime juice to prevent sticking of rice.
  • Add drained basmati rice into it,mix gently and close the lid.
  • Keep at high flame for few minutes till the water evaporates.( Be careful not to get burnt)
  • Immediately reduce the flame to low and turn the rice from bottom to top on all sides and gently level the rice.
  • Close the lid and cook for 2 to 3 mins..
  • Rice should be 80 percent cooked, remaining it will cook on dum..Off the flame and keep aside with lid closed.
     Layering the rice and dum:
  • Divide the chicken-prawn veg masala and rice into two equal parts..
  • Transfer the rice into another big plate..In same biryani pot, spread one part of  masala in circular motion.
  • Take one part of rice and pour on top of masala,covering everywhere. Level it with a back of large spoon,sprinkle few garam masala powder and few chopped mint-coriander leaves on top of the rice...
  • Then pour another part of masala and repeat the step.
  • Top part should be covered with rice..Sprinkle remaining garam- masala pdr and herbs like how you layered on rice earlier..level it with large spoon
  • Sprinkle caramalised onions, cashews and raisins sparingly on top of it.(optional)
  • Sprinkle rose water sparingly on top of rice ( optional)..
  • Cover it with aluminium foil on top of the vessel (optional)..Close it with lid on top of that..It is mainly done to tight the lid,so that steam will not escape while on dum..It will retain flavour and aroma of biryani..As a substitute, you can stick wheat dough on  top sides of a vessel in circular motion and cover it with a lid on top of it..
  • Place tawa or steel platter  ( It is done to avoid burning at bottom during dum) and place biryani pot on top of it.
  • Keep at very low flame and cook for 30  mins...
  • At the time of serving,remove the foil and serve it on a large plate...  


Monday, July 21, 2014

Masala Oats Soup - Chicken and Veggies Oats Soup


Earlier, I shared some of the oats items like Oats Upma,Oats Puttu and Oats-Rava Idli...Today,I am sharing a easy,healthy and tasty oats soup..Additional to it, chicken and veggies are added which makes oats soup more tasty..It tastes reminds me of hyderabadi haleem,which used mashed whole wheat,meat and spices...Its is a refreshing soup,which can be served for iftar (breaking the fast) as well as suhoor ( Pre-dawn meal)..We love this soup very much..Do make this soup..I am sure, everyone in your family will love it...Lets go to the recipe :)

Recipe inspired from here,but slightly altered according to my taste :)


    Ingredients

      For Marinating Chicken:
  • Chicken Breast - 200 gm
  • Red chilli pdr - 1/2 tsp
  • Pepper pdr - 1 tsp
  • Garam masala pdr - 1/4 tsp
  • Turmeric pdr - a pinch
  • Salt - adjust accordinly

      For Oats masala:
  • Instant oats ( like Quaker) / Rolled oats - 1 1/2 cups  
  • Small onion,chopped - 1 no. ( or half of one large onion).
  • Ginger-garlic paste - 1 tsp
  • Chopped green chillies - 2 no.s
  • Any veggies of your choice, I used : ( Can use frozen veggies too)
          Finely chopped carrot - 2 tbsp
          Finely chopped beans - 2 tbsp
          Frozen green peas - 3 tbsp ( can use freshly cooked green peas too).
  • Chopped coriander leaves - 11/2 tbsp
  • Pepper pdr - 1 tsp
  • Turmeric pdr - 1/4 tsp
  • Garam masala pdr - 1/2 tsp
  • Lemon juice - 1 tsp
  • Water - 3 cups
  • Thick coconut milk - 1/2 cup ( or you can use 5 to 6 tbsp of coconut pdr mixed in warm water)
  • Caramalised (fried) onion - few ( optional)
  • Salt - to taste
  • Ghee / Butter - 1 tsp
  
    Method

       For Cooking Chicken:
  • Marinate chicken as mentioned in 'For marinate' and keep aside for 10 mins..
  • Add marinated chicken in a pan by adding little water..Close the lid and cook for some time..
  • After few minutes, turn the chicken pieces and cook till water dries out completely and both sides are brown ..
  • Off the flame and set aside to cool..When it cools down, shred into pieces and set aside...

      For Cooking Oats:
  • In a non-stick medium wide vessel,heat 1 tbsp of oil and add chopped onion and saute till pink..
  • Add ginger-garlic paste and saute till raw smell goes away..
  • Add vegetables and saute at a high heat for 2 mins stirring occasionally..Make sure to use finely chopped veggies,otherwise its difficult to cook...Ignore this step,if using frozen veggies..Just saute it for few seconds,as it is already cooked...
  • Add chopped coriander leaves and saute well..
  • Add all the spice powders mentioned and saute till raw smell goes away...
  • Add instant oats and mix well...If using rolled oats, just grind it coarsely ( not fine pdr) at one second...
  • Add lemon juice and salt and mix well..
  • Add water, close the lid and cook oats at medium-low flame for 3 minutes..Don't cook it at high flame, as oats may stuck bottom of the pan and form lumps...
  • Add thick coconut milk,stir well and cook for few seconds..
  • Taste it and add salt and pepper if required...
  • Off the flame,add fried onions ( optional) and add a blob of ghee/butter on top..
  • Serve warm....

     Notes:
  • Vegetarians can ignore chicken..
  • Oats soup tends to become thick when it cools down..Don't worry, just add little water and warm again at the time of serving...
  • It tastes more delicious when served warm...


Sunday, July 20, 2014

Erachi Pola - Meat Masala Cake ( Malabar Spl)


Earlier, I shared some of the malabar sweet version of pola like apple polakayi pola and kadala pola..Today, I am sharing a savoury version of pola i.e Erachi pola - Meat masala layered cake..I used left over cooked beef,which I combined to make masala..You can also make it with chicken or mutton.. It is done by layering of bread-egg batter and meat masala,which is definitely a slow cooked one...I made this yesterday and my family loved this very much..Instead of savoury, you can make sweet fillings too.. Its very easy to prepare ..It tasted delicious and can be served for iftar..Do try this snack and impress your family..Off to the recipe :)


   Ingredients

     For Batter:
  • Brown/White Bread - 8 pieces ( remove brown crust on all sides)
  • Small Eggs - 4 no.s 
  • Milk - 1 cup
  • Pepper pdr - 1/2 tsp
  • Salt - adjust accordingly

        For Masala:
  • Cooked Beef / Mutton / Chicken, shredded - 1 cup ( pressure cooked with red chilli pdr, pepper pdr, garam masala pdr, turmeric pdr and salt).
  • Onion,chopped - 2 small.
  • Ginger - garlic paste - 1 1/2 tsp
  • Chopped green chillies - 2 no.
  • Chopped capsicum - 4 tbsp ( optional)
  • Chopped coriander leaves - 1 tbsp
  • Turmeric pdr - a pinch
  • Garam masala pdr - 1 tsp
  • Pepper pdr - 1 tsp
  • Chopped curry leaves - 2 to 3 tbsp
  • Salt - to taste
  • Oil - 1 tbsp
  • Ghee - 1 tsp

    Method
  • In a blender, add all the ingredients mentioned in ' For Batter' and blend into smooth-thick batter..Keep aside.
  • In a fry pan, heat l tbsp of oil, add chopped onions sprinkled with salt and saute till light pink..
  • Add ginger-garlic paste and chopped green chillies and saute for few seconds till raw smell goes away.
  • Add capsicum and chopped coriander leaves and saute well..
  • Add all the spice powders and saute till raw smell goes away..
  • Finally add cooked shredded beef and saute well..
  • Add chopped curry leaves and mix well..
  • Taste and adjust salt and spices..
  • Close the lid and cook at low flame for 3 minutes to infuse the flavour...
  • Off the flame and set aside..


        For assembling Pola:

  • Heat a non-stick medium wide sized pan, add 1 tsp ghee and swirl or greese the pan on all sides of pan..Turn the flame into lowest..
  • Pour half bread-egg batter and swirl the pan immediately..Close the lid and cook for few seconds..


  • Spread meat masala in a circular motion and close the lid and cook for few seconds..

  • Open the lid and pour remaining batter on all sides..


  • Close the lid and cook for 30-35 minutes at a very low slow flame ( That's very important) till sides and bottom are brown in colour i.e when you touch on top, it should spring back...
  • You can also place tawa under the pan, to prevent burning on bottom..
  • Close the flame and flip it on large plate...
  • When it slightly cools, cut it into wedges..
  • Serve warm with the cup of tea or coffee..


Tender Coconut - Mango Smoothie


Today, I am sharing a refreshing and healthy smoothie,Tender Coconut - Mango Smoothie..Do check,some of the mango items I posted earlier,here and here..Its a tasty drink and can be served for iftar...Lets go to the recipe :)


    Ingredients

  • Ripe Mangoes, chopped - 2 no.s
  • Tender Coconut pulp ( elaneer kamb) - 1 cup
  • Tender Coconut water ( elaneer) - 1 1/2 to 2 cups
  • Sugar - 4 to 5 tbsp ( adjust accordingly)
  • Broken Cashews - for decorating ( optional)


    Method

  • In a blender, add all the ingredients except cashews and blend thoroughly..
  • Pour this juice in a jug and refrigerate...
  • Pour these in a glass and decorate broken cashews on top..
  • Serve chilled..


Tuesday, July 15, 2014

Virgin Pina Colada


Pina Colada' is a Spanish word which comes from the word " Pina'' means Pineapple and "Colada'' means strained..Pina Colada is a alcohol based drink made from strained pineapple, rum, coconut cream,which is blended with ice and decorated with pineapple wedges or cherry..It is said that this drink is first introduced in Puerto Rico, an island near Spain...Source Wikipedia
You might be thinking, am I posting alcoholic drink??..Of course not!!!...I am posting a non-alcoholic version of pina colada named Virgin Pina Colada..Instead of pineapple, you can add any fruits of your choice...Its a tasty and refreshing drink..You can serve this for iftar too..Do make this drink and impress your family..Let us go to the recipe..


     Ingredients
  • Pineapple,sliced - 8 pieces
  • Sugar - 5 to 6 tbsp ( can increase according to your sweetness)
  • Coconut Cream - 1 tin ( can substitute it with 1 cup tender coconut pulp and tender coconut water or thick coconut milk)
  • Ice cubes - accordingly
  • Pineapple wedges/ cherry - for decorating ( optional)

     Method
  • In a blender or mix, blend all the ingredients mentioned along with ice cubes...
  • Strain and pour it in a glass..
  • Decorate it with pineapple slice or cherry on top...
  • Serve chilled


Monday, July 14, 2014

Kadala kums/ Kadala Pola - Split Bengal Gram / Chana dal / Kadala parippu cake


Earlier I shared the recipe of sweet malabar cake like apple pola and kayi pola...Its method is same as I mentioned in previous polas...Today, I am sharing a recipe of kadala pola/ kadala kums i.e split bengal gram ( chana dal) cake..Its a healthy cake which is made of lentils and eggs,which is slow cooked in pan instead of baking in oven...Its good for kids who don't eat lentils and eggs..My son who don't eat lentils, love this cake very much..My parents too love this cake too..Its not common in my area,but its common in my hubby's area..My SIL makes this pola often..I love her version too..I got this recipe from my cookbook,but altered the ingredients slightly according to my taste..My SIL make this in sponge cake version,she increased the quantity of flour instead of increasing milk..I add mixed version of both flour,milk powder and milk..Its a easy recipe to make and tastes delicious...Do make it for your kids and family..Lets go to the recipe.


     Ingredients
  • Chana dal / Kadala paripp - 150 gm
  • Eggs - 3 large or 4 small no.s
  • Milk powder - 3 tbsp
  • All purpose flour ( maida) - 2 tbsp
  • Milk - 2 tbsp
  • Sugar - 8 to 10 tbsp ( I used 7 tbsp and its less sweet for me)
  • Green cardamon - 2 no.s
  • Salt - a pinch
  • Ghee - 1 1/2 tsp
  • Chopped cashew nuts / raisins for decorating - optional

     Method
  • Soak chana dal in a water for 6 hrs or soak overnight..Wash the dal with few couplets of water.. Pressure cook the dal for 2 whistles..If dal is not soaked, pressure cook for more than 6 whistles till cooked...Drain in the colander and keep aside to cool...

Image source: Internet
  • In a mixi or blender, grind the cooked chana dal with little milk into smooth paste...Add whole cardamon, milk powder and flour and blend it thoroughly...Keep aside..

  • In a bowl, add eggs and beat the eggs with salt by using electric hand beater at high speed till creamy..Add sugar and beat again till it reach double in volume..You can use whisk or you can blend in mixi too,together with cooked dal paste...( I beat the eggs seperately,as I want the pola to be fluffy)..

  • Add cooked chana dal paste and fold slowly till it mixed well...If the batter is too thick, add 1 tbsp milk and mix well...Add chopped cashew nuts and raisins and mix well ( optional )
  • Heat a fry pan or sauce pan, add ghee and swirl the pan from all sides..You can grease the pan with tissue paper too...
  • Pour  chana dal - egg batter into the pan..Close the lid and cook at a very slow flame for 30 to 35 mins till fork or knife inserted in the centre comes out clean..You can place tawa under the pan to avoid getting burnt at bottom..
  • Off the flame and flip it over the plate..
  • Serve warm with a cup of tea or coffee..


Similar Recipes


kayi pola                                                                  Apple pola


Sunday, July 13, 2014

Wheat Chicken Samosa

Samosas are a deep fried snack which is served as a snack or as a street food snack..Its outer covering is made up of  all purpose dough,which is filled with veg/non veg filling and folded into triangle shape and deep fried in oil..I think there is no Indian,who don't love hot and crispy fried snack..Even Arabs too make samosas..It is served in Lebanese restaurant too,which is near to my locality..Their fillings is not too spicy,but it tastes awesome...I tasted Punjabi Samosa in food outlet of one of the mall in Dubai..It tastes delicious. Mostly it do have veg filling, a combination of potato, green peas and other vegetables ...Now a days, samosa wrappers are available in almost all supermarkets,which makes our life easier..You can prepare your own fillings and fold it..I notice that store bought samosa wrappers absorb too much oil while deep frying. Instead of store bought, you can prepare your own dough..Its not difficult to make....
Today, I am sharing a recipe of healthy samosa...Instead of all purpose flour (maida), Wholewheat flour is used to prepare dough..I used chicken fillings,which is of course prepared by own...Instead of deep frying, I shallow fried in little oil..You can bake too..Left over can be refrigerated..Do make this samosa and impress your family..You can make this for snack or Iftar too..Lets move to the recipe :)


     Ingredients

        For dough:
  • Wholewheat flour / All purpose flour -  1 1/2 cups
  • Baking powder - 1/4 tsp ( optional)
  • Salt - a pinch
  • Oil - 2 tbsp
  • Cumin seeds - 1 tsp ( optional)
  • Water - required to make dough.
      For Filling:
  • Boneless chicken,shredded - 1 cup ( cooked with chilli pdr,turmeric pdr, garam masala pdr, salt and pepper pdr,with little water and shred into pieces ).
  • Onion,chopped - 1 medium size
  • Carrot,chopped finely - 3 to 4 tbsp ( optional )
  • Ginger-garlic paste - 1 tsp
  • Green chilllies chopped -  1 to 2 no.s
  • Turmeric pdr - a pinch
  • Garam masala pdr - 1/4 tsp
  • Red chilli pdr - 1/2 tsp
  • Pepper pdr - a pinch
  • Tandoori masala pdr - 1 tsp ( optional)
  • Chopped coriander leaves - 1 tbsp
  • Chopped curry leaves - 1 tbsp
  • Thick yogurt - 2 tsp
  • Salt - to taste

      Method
  • In a bowl, mix all the ingredients mentioned 'For Dough'and make into smooth dough..Cover and keep aside for 1 hour..
        For Filling:
  • Meanwhile make filling for stuffing samosa..In a pan,heat 1 tbsp of oil and add onions, sprinkled with salt and saute till pink..
  • Add ginger-garlic paste and chopped green chillies and saute till raw smell goes away..
  • Add chopped carrots (optional) and saute at high flame for 1 minutes..
  • Then lower the flame and add all the spice powders and saute till raw smell goes away..
  • Add chopped coriander leaves and saute well..
  • Add cooked shredded chicken and saute well..
  • Finally add yogurt and chopped curry leaves and mix well..
  • Taste and adjust salt and spices..
  • Close the flame and cook at medium flame for 2 minutes...Off the flame and set aside.
        For samosa dough:
  • Knead the dough and divide it into small equal balls..
  • Take one ball,dust the work surface or rolling board with flour and flatten the dough thinly with rolling pin..
  • Cut the dough with four equal halves as shown in the picture..


  • Take one half of dough, fold one part and press the tip and fold other part too and press where the tip is pressed previously,which is formed into cone shape as shown in the picture...Stick the edges of folded parts firmly.. You can make a thick paste of flour with little water and stick the edges ( I didn't use it)
  • Place the fillings inside the cone and close the edges and stick the dough firmly...

  • Make sure there should not be any gap in this dough, as it may absorb too much oil when deep frying it..
  • Repeat the steps when all the dough and fillings are used up..
  • You can deep fry or shallow fry it in little oil..You can bake the samosas too by greasing oil on all sides..
  • You can keep left over samosas in a freezer and use it when desired..
  • Serve warm with ketchup with a cup of tea or coffee..

For detailed folding of dough,pls refer here


 “Sending this entry to Ahlan Ramadan –The Healthy Way” ,hosted by Rafeeda, Hasna and Humi"


Wednesday, July 9, 2014

Oven Roasted Chicken


Today, I am sharing a healthy chicken fry,which is baked in oven, instead of deep frying.When compared to deep frying, it took time to cook..But never mind, its a healthy fry and too much oil is not required...It tastes very delicious and my hubby love this fry very much...This recipe is certainly my own...I used chicken thigh..You can use drumstick ( chicken leg) too or cut it into medium pieces..We had it last Friday as a side dish for prawns biryani...Oops!!I forgot to take the picture of prawns biryani..Don't worry reader, I'll take the pics and will include the recipe,when I make again...If you don't have oven,don't worry..You can do it in various steps like, boiling marinated chicken with little water till evaporates and shallow fry it in little oil till crisp on both sides..Instead of boiling,you can steam too( Don't forget to shallow fry in little oil, otherwise you won't get crispier effect)...Do try this healthy and delicious baked chicken and impress your family..Let us go straight to the recipe :)


Roasted in oven

     Ingredients

  • Chicken thigh /Chicken leg / Chicken leg with thigh/ Cut chicken into medium size pieces - 500 gm
  • Ginger-garlic paste - 1 1/2 tsp
  • Kashmiri Chilli powder - 2 tsp
  • Turmeric pdr - 1/4 tsp
  • Garam masala pdr - 1/2 tsp
  • Black Pepper pdr - 1/2 tsp
  • Tandoori/Tikka masala - 1 tsp ( optional) [ Instead,you can add 1/4 tsp of  K.Chilli pdr, 1/2 tsp of cumin pdr ,1/2 tsp of coriander pdr and a pinch of kasoori methi ( dry fenugreek leaves), if having].
  • Thick yogurt - 1 tbsp
  • Lemon juice / Vinegar - 1 tsp
  • Salt - adjust accordingly.
  • Olive / Vegetable oil - for greasing pan + drizzling on top of chicken

    Method
  • Clean and remove the skin and fat of chicken..Wash thoroughly and drain in colander..Make gashes on chicken,here and there,on both sides..Keep aside for few minute.
  • Make a paste of ingredients mentioned above except chicken..Apply this paste all over the chicken pieces ( Marination)..Refrigerate for about 6 hrs OR if you are in a hurry, then keep it in freezer for 1 hr and after that place it in fridge for 15 to 20 minutes...You can marinate overnight too ( keep it in fridge, not freezer)..Longer you marinate, more tastier it will be...
  • Preheat the oven to 200 degree Celcius..
  • Grease the baking pan with olive oil and place chicken pieces..Drizzle some oil on top of all chicken pieces..I covered the baking pan with aluminium foil,so its easier for me to clean the baking dish,I greased oil on top of it and placed chicken over it...
  • Bake for about 25 minutes on one side and turn over and change the temperature to 220 degree C and cook for another 15 mins...When the liquid oozes out from chicken, it indicates done..Each oven differs, so check after 15 minutes each..If you are using convection oven, set it to 'roast' mode and adjust the 'weight' of chicken..
  • When you take out chicken from oven, you may find it is cooked inside and outside is not crispy..Don't worry, you can grill or shallow fry it with little oil( or you can use left over oil, which is cooked with chicken)at high flame for 1 second on both sides,till slightly crisp..Don't over fry it for too long as chicken is already cooked..Don't make it too crisp either,otherwise chicken will become hard..
  • Serve warm as a side dish for biryani, rice, chappati, kuboos (pita bread)...


Tuesday, July 8, 2014

Chicken Bread Cutlet


Normally, Cutlets are made with mashed potatoes which is combined with meat or vegetable masala that is shaped into patties,dipped in egg batter, coated with bread crumbs and deep fried with oil..Today, I am sharing a recipe of bread cutlet... Instead of mashed potatoes, bread is used, which is shaped either in round or cylindrical shape...If you have leftover bread or if you have large quantities of bread, do make this snack....Its method is similar that I shared in crispy chicken cheese balls earlier...Whenever, I make this snack, its always a hit among my family..You can make these in large quantities and can be kept in freezer..Thaw it before deep frying .. You can make your own masala for this...Its a easy and delicious snack which can be served for iftar...Do try this yummy snack and impress your family...Lets go to the recipe :)

Recipe Courtesy: Umma


        Ingredients:
  • Shredded chicken,cooked - 1 cup ( chicken cooked with pepper pdr,turmeric pdr and salt, de-bonned and shredded)
  • Onion,finely chopped - 1 large
  • Ginger-garlic paste - 1 tsp
  • Green chilly,chopped - 1 or 2 no.s
  • Turmeric pdr - a pinch
  • Pepper pdr - 1/4 tsp
  • Garam masala pdr - 1/4 tsp
  • Coriander leaves,chopped - 1 tsp
  • Curry leaves,chopped - 1 tsp
  • Egg white - 1 
  • All purpose flour ( maida) - 1 heaped tsp
  • Bread slices - 10 to 12 no.s 
  • 2 bread slice + 1 handful of cornflakes - ground into fine or coarse powder (Or you can use bread crumbs itself )

      Method

      Making of Chicken masala:
  • Heat a fry pan,add onion and saute till pink.
  • Add ginger-garlic paste and green chillies and saute for few seconds.
  • Add all the spice powders and saute till raw smell goes away.
  • Add salt ( adjust accordingly as cooked chicken contains salt) and coriander leaves and saute well.
  • Add cooked shredded chicken and saute for 5 mins.
  • Finally add chopped curry leaves and saute for few seconds. Off the flame and keep aside to cool.

      For outer crust and dipping:
  • Remove the crust(brown side) of the bread and keep aside.For easy removing of the crust, place 4 to 5 breads on top of each other,press the breads and cut the brown edges with knife. Repeat with other slices and keep aside. 
  • In a small bowl, make a paste of egg white and all purpose flour thoroughly with little water and keep aside.
  • Place grounded bread and cornflakes in a plate and keep it ready.
  • Divide the chicken masala according to the number of bread slices.
  • Place little water in a bowl, soak one slice of bread in a water for half second and take out immediately...Don't soak it too long,otherwise bread will break..( you should make this process faster).
  • Place soaked bread in your palm and press it with your other palm and drain out the water completely. This process is done in order to keep the bread soft. 
  • Place one  tsp of chicken filling ( it depends upon the slice of bread i.e if using large slice bread add 2 tsp of filling and if using small size bread, use 1 tsp of filling)..
  • Close the edges from side to top and make it into ball or cylindrical shape.. Don't overcrowd the feeling as it may break while deep frying..
  • Repeat the steps till all bread and masala is used up.
  • Dip each of the bread cutlet with egg - maida ( all purpose flour) mixture and roll the balls completely in bread-cornflakes powder. 
  • In a deep pan, heat generous amount of oil at medium heat. When it turns hot,add all the balls one by one and deep fry these till both sides are golden brown in colour. 
  • Take out and drain the balls. Place these on paper kitchen towel.
  • Serve warm..It tastes better when hot..When you bite it, it gives crunchy taste.
  • Serve it with a tomato ketchup or serve as it is..Have it with a cup of tea or coffee.


      Notes:
  • Instead of chicken, you can substitute with soya chunks or vegetables or you can make it with sweet filling too like coconut and dates...
  • You can make your own filling and play with the spices of your choice.
  • Leftover or you can make large quantities of balls and keep it in freezer. Thaw for 1 hr before deep frying it.

Sunday, July 6, 2014

Malabar Chicken Biryani


Earlier, I shared some of the biryani from my hometown, Kannur like  mutton biryaniveg biryani and fish biryani...I made this biryani when I have cousin for lunch 3 weeks ago...I had the combination with prawns roast ,which I shared earlier....I don't have much to say :)...Do try this easy and tasty biryani and impress your family..Lets go straight to the recipe :)

Recipe courtesy: Umma


   Ingredients

     To marinate:
  • Chicken, cut into medium pieces  - 1200 gm
  • Turmeric pdr - a pinch
  • Vinegar/lime juice - 2 to 3 tsp
  • Pepper pdr - 1 tsp
  • Salt - a pinch

      For Masala:
  • Onions,thinly sliced - 5 large or 6 medium sized
  • Garlic - 1 & half whole
  • Ginger - size of middle finger
  • Green chillies - 10 large or 15 bird eye chillies ( depends upon your spice level)
  • Chopped coriander leaves - 1/2 cup + 1/2 cup for decorating
  • Chopped mint leaves - 1/4 cup + 1/3 cup for decorating
  • Tomatoes,sliced - 3 large or medium sized
  • Garam masala pdr - 1 tsp + few for sprinkling
  • Salt - to taste  
  • Lime juice - 1 tsp

      For Ghee rice :
  • Basmathi rice / Jeerakashala (kaima rice ) - 6 cups
  • Ghee - 1 tbsp
  • Oil - 2 tbsp
  • Cardamon -  3 no.s
  • Cloves -  5 no.
  • Cinnamon - one large, broken
  • Bay leaf - 1 ( optional)
  • Water - 9 3/4 cups ( 1 cup of rice = 1 3/4 cups of water)

      For Garnishing:
  • Onion,thinly sliced - 1 large or 2 medium sized
  • Cashew nuts - 10 no.s
  • Raisins - 7 no.s
  • Saffron - a pinch mixed with 2 tbsp milk and set aside for 15 mins ( optional )
  • Rose water - few for sprinkling ( optional)

   Method:
  • Soak basmati rice in water for 30 mins.  If using jeerakashala rice,ignore this step.Wash the rice thoroughly with 2 to 3 couplets of water,drain rice in the colander and keep aside.
  • Wash the chicken and drain in colander. Marinate chicken with ingredients mentioned in " To marinate ' and keep aside for 15 to 30 mins..
  • Make a paste of ginger +garlic+ green chillies and set aside.
    For making masala
  • Heat oil in a medium sized deep pan, add sliced onions with salt and saute till translucent.
  • Add ginger-garlic-chilli paste and saute for few seconds.
  • Add sliced tomatoes and saute till mushy.
  • Add chopped coriander + mint leaves and saute for few seconds.
  • Add garam masala pdr and saute till raw smell goes away.
  • Add marinated chicken and mix well thoroughly.Do not add water in between ,as chicken, onions and tomatoes itself releases water while cooking..
  • Add salt and lemon juice and mix well..
  • Close the lid and cook for 25 to 27 minutes at medium low flame till chicken cooks..Can stir in between slowly...Don't make it too dry as there should be moisture left for dum..Gravy should not be too watery...It should be of semi-thick consistancy..Off the flame and set aside.. 

       Making of ghee rice.
  • In a large wide non-stick casserole/biryani pot , heat ghee + oil for few seconds.
  • Add thinly sliced onions and saute till light brown. Adding few pinches of sugar will caramalise onion faster. Drain and keep aside.
  • Add cashewnuts and raisins and saute till cashewnut turns light brown and raisins puffed up. Drain and keep aside.
  • In a same vessel,add all the whole spices mentioned and saute for few seconds.
  • Add water and let it boil till the bubbles comes.
  • Add salt and sprinkle few lime juice to prevent sticking of rice.
  • Add drained basmati rice into it,mix gently and close the lid.
  • Keep at high flame for few minutes till the water evaporates.( Be careful not to get burnt)
  • Immediately reduce the flame to low and turn the rice from bottom to top on all sides and gently level the rice.
  • Close the lid and cook for 2 to 3 mins..
  • Rice should be 80 percent cooked, remaining it will cook on dum..Off the flame and keep aside with lid closed.

     Layering the rice and dum
  • Divide the chicken masala and rice into three equal parts..
  • Transfer the rice into another big plate..In same biryani pot, spread one part of chicken masala in circular motion.
  • Take another part of rice and pour on top of masala,covering everywhere. Level it with a back of large spoon,sprinkle few garam masala powder and few chopped mint-coriander leaves on top of the rice..
  • Then pour another part of chicken masala and repeat the step.
  • Top part should be covered with rice..Sprinkle remaining garam- masala pdr and herbs like how you layered on rice earlier..level it with large spoon
  • Sprinkle caramalised onions, cashews and raisins sparingly on top of it.
  • Sprinkle saffron-milk  and rose water sparingly on top of rice ( optional)..
  • Cover it with aluminium foil on top of the vessel as shown in the picture below (optional)..Close it with lid on top of that..It is mainly done to tight the lid,so that steam will not escape while on dum..It will retain flavour and aroma of biryani..As a substitute, you can stick wheat dough on  top sides of a vessel in circular motion and cover it with a lid on top of it..
  • Place tawa or steel platter  ( It is done to avoid burning at bottom during dum) and place biryani pot on top of it.
  • Keep at very low flame and cook for 30 to 40 mins...
  • At the time of serving,remove the foil and serve it on a large plate...  
  • Serve warm with the combination of your choice like pickles, raita etc.
   Notes:
  • Do not pressure cook the chicken as it may not infuse flavour of masala..Chicken will not take too much time to cook..It cook minimum 20 to 25 minutes depending upon the quantity of chicken used.. 
  • Cutting,chopping and pasting of ingredients can be done previous night to save time for making biryani..
  • If you have guest, make biryani masala previous day and refrigerate..Next morning, make ghee rice and layer it for dum..
  • It is better to reduce water for biryani ghee rice than normal ghee rice, as it will prevent rice from getting mushy while on dum..

Saturday, July 5, 2014

Wholewheat Pizza


Pizza is a oven-baked flat bread which is topped with tomato sauce, meat and vegetable toppings and shredded mozzarella cheese (made from buffalo cheese)..The origin of pizza is in Naples,Italy, and it spread around the world...Pizza is traditionally baked in wood-fired brick oven..Now-a-days pizzas are baked in different ovens like convection - combination oven,pizza stone etc...There are many varieties of pizza...Toppings of pizza may change according to one's region...Pizza crust may be either thick or thin..In Italy alone, there are more than 100 varieties of pizza..
Normally,pizza crust is made up of all purpose dough...I decided to make change...For a healthy alternative, I use whole wheat dough..I made my own pizza sauce and toppings..You can add any toppings of your choice..I made this in Iftar,which is a hit among my family,who came to stay with me for 10 days ..It tastes amazingly delicious...Homemade pizza is better than store bought one...Pizza dough is available in almost all supermarkets..Instead of store bought pizza dough, you can make it at home..Store bought pizza dough may not taste delicious..Its not difficult to make..Its a easy and tasty pizza,which can be made for Iftar too..Do make this pizza and impress your family..
( Sorry for the bad quality pictures, I took this photo in a hurry.I even edited it,but I got these much clarity)


    Ingredient

      For Pizza dough:
  • Wholewheat flour / All purpose flour - 2 cups
  • Instant yeast / Active-dry yeast - 1 1/3 tsp ( Increase upto 2 tsp,if climate is colder)
  • Brown/ White Sugar - 1 tsp
  • Salt - 1 tsp
  • Olive oil - 1 tbsp
  • Warm milk,mixed with little water - 1 cup or more ( for kneading)
     For Toppings:
  • Cooked Shredded Chicken - 1 cup ( see recipe below)
  • Cooked Vegetables - 1 cup ( see recipe below)
  • Mozzarella cheese,grated - accordingly
        For Chicken:
  • Chicken breast - 1 piece ( 200 gm)
  • Paprika Powder - 1 tsp
  • Garlic powder / Garlic paste - 1 tsp
  • Ginger powder/ Ginger paste - 1/2 tsp
  • Black pepper pdr - 1 tsp
  • Oregano - 1 tsp
  • Thyme - 1/2 tsp
  • Vinegar - 2 tsp
  • Salt - to taste
       For Vegetables:
  • Mushroom,sliced - 3 no.s ( optional )
  • Capsicum,cubed - half of one capsicum
  • Onion,cubed - 1 small
  • Black pepper pdr - 1/2 tsp
  • Oregano - 1 tsp
  • Thyme - 1/2 tsp
  • Salt - to taste
  • Olive oil - 1 tsp

     Method:
  • Marinate chicken with above mentioned ingredients 'For Chicken' and refrigerate for 30 minutes to 1 hour..Grill or shallow fry the chicken with little oil till cooked and crisp on both sides..Keep aside to cool and shred into large pieces...
  • In a large bowl,add all the dry ingredients mentioned in 'For pizza dough' and mix thoroughly..If using active dry yeast ( whole yeast), mix yeast in 1/3 cup of warm water ( not boiling hot) and keep aside for 10 mins to active ( form bubbles and frothy when rises)...If using instant yeast ( powdered activated yeast), ignore this step as it is already activated,you can mix directly with flour...Add warm milk + water and knead into smooth dough..If your dough becomes hard, add more warm milk or water and knead again...If your dough becomes too sticky,rub your hand with olive oil, add little flour and knead again..Knead for 10 to 12 mins till the dough becomes smooth...More you knead,more softer the dough will be...( Sorry, I forgot to take the photo..Hope you understand)
  • Place this dough in a large bowl and cover it with a cling film or damp cloth and place a large plate on top of it or you can place this in a hot casserole..Set aside for 1 hour or more to rise ..If the climate is hotter, it rise quickly..If the climate is colder, its difficult to rise, so keep somewhere at warm place like cupboard or shelf....
  • Meanwhile,make pizza sauce mentioned here, if you didn't make it...
  • In a fry pan, add little oil and saute all the vegetables one by one for few minutes..If using mushroom,close the lid and cook at high flame for 1 minute..Then lower the flame and add all the seasonings mentioned and saute ...Close the flame and set aside to cool..
  • Let us see the pizza dough...After l hr or more, it might be risen into double...Punch the dough and kneed the dough again for 10 sec.
  • Take a pizza pan ( I didn't have pizza pan, I used pie pan)..Greese the pan with olive oil on all sides...Place the dough on the pan and flatten it with your palms ( apply olive oil in your palms) equally with same thickness..Or you can roll it with a rolling pin in equal thickness  and place iton a pizza pan and then flatten slightly with your palms..You can make a design at the edges as shown in picture(optional).. Keep aside for 10 minutes..
  • Meanwhile, preheat the oven to 180 degree C..
  • Make a slits in a dough with a knife or prick it with a fork here and there ( see pic below)..This is done, to prevent rising of dough during baking...
  • Spread pizza sauce on the dough as shown in picture below...
  • Top it with vegetables sparingly and finally top it with shredded chicken..
  • Sprinkle mozzarella cheese sparingly..
  • Place this in a preheated oven and bake for 25 to 27 minutes till done...If using convection oven, press 'pizza' or 'crusty' button and select weight accordingly...
  • Take it out from oven and let it cool for few minutes...Slice into wedges and serve warm. You can also microwave it at the time of serving...
  • Remaining can be refrigerated and can be microwaved at the time of serving..It tastes more delicious when eaten next day too..

Preparation of pizza

      Note:
  • Always check the expiry date of yeast..If the yeast is near to expiry date,better discard it..Don't use it on dough as it may not rise and its not good for health too..
  • Pizza dough softness depends upon the time taken for kneading..Pizza dough must be smooth..If the dough is hard,it may not taste good...
  • You can add any toppings of your choice..
  • Don't overcrowd the toppings of pizza, otherwise topping may fell when a slice is taken by hand...